|
|
A Brief Exposé of
|
|
(Please note that when I began these notes, Jenkins had been set up by a colleague getting its WAR and merely dropping it into Tomcat. The second time, I did it myself and used a more modern way, described here.)
$ wget -q -O - http://pkg.jenkins-ci.org/debian/jenkins-ci.org.key | sudo apt-key add -
$ deb http://pkg.jenkins-ci.org/debian binary/
$ sudo apt-get update
$ sudo apt-get install jenkins
If you find that apt-get update, doesn't work, see here. If you find that you're unable to use wget on the host you're trying to install, it may be that your IS department has blocked that, so you'll have to obtain the key separately, copy it to the target host, then install it:
$ wget -q -O - http://pkg.jenkins-ci.org/debian/jenkins-ci.org.key > jenkins-ci.org.key
$ ll
total 12
drwxr-xr-x  2 russ russ   88 2012-10-05 13:09 .
drwxr-xr-x 94 russ russ 4040 2012-10-05 13:08 ..
-rw-r--r--  1 russ russ 7060 2012-10-05 13:09 jenkins-ci.org.key
$ scp jenkins-ci.org.key [email protected]:/home/russ
[email protected]'s password:
jenkins-ci.org.key                                   100% 7060     6.9KB/s   00:00

(Later, on the target host...)
russ@acme-buildserver $ sudo cat jenkins-ci.org.key | apt-key add -
All that failing because you're behind a firewall, download the package by hand, copy it to the host you are installing.
See http://pkg.jenkins-ci.org/debian/ for Debian package.
russ@acme-buildserver $ sudo dpkg -i jenkins_1.522_all.deb
From here, you can pick the original instructions back up. Once Aptitude has installed Jenkins, however, it will try to launch it (as a service). If you're already running Tomcat on your host, this will fail because Tomcat's using port 8080. You can see this by using top to look for Tomcat and 8080:
russ@acme-buildserver $ sudo top
Just press SHIFT M on the keyboard while running top.
You have two options. If you're not doing anything with Tomcat, but just thought it would be a good idea to run it on your target host, and if you don't plan to run it for any other reason than Jenkins, remove it, then launch Jenkins:
russ@acme-buildserver $ sudo apt-get remove tomcat6
russ@acme-buildserver $ sudo /etc/init.d/jenkins start
At this point, Jenkins own Tomcat will be used. Some of the other musings below may not be as I've documented them.
The other solution, because you want Tomcat for other things, is to remove Jenkins, go find it in WAR form, then simply drop it into Tomcat's webapps subdirectory. That's the basis for the installtion I document here.
I found that doing Jenkins "the modern way" is a lot nicer especially if you have to debug your project's build set-up. When runing the WAR under user tomcat6, keeping permissions straight as you experiment with solutions to broken builds is a lot of extra work that, if you don't restore permissions correctly, will result in broken builds.
...and what do I do with it before setting up my job/project?
Unless you've installed it as a WAR in your existing Tomcat set-up, you can reach it by going to http://localhost:8080/. That is, if you're doing this from a browser running on the host on which you set it up. Otherwise, it's the DNS-recognizable hostname of the host on which you set it up.
Before you get started setting up your first project, you need to configure a few things. For me these are:
In your browser, beginning at the Jenkins Dashboard, you'll be using the Manage Jenkins link for most of this.
Go to Manage Plugins.
Check the list of plug-ins Jenkins already has to ensure the Git plug-in isn't already there by clicking the Installed tab.
To install it, click the Available tab and type "git" into the Filter. Look for "Jenkins GIT plugin" and click the checkbox, then Install without restart. (You can restart later if need be.)
(Note: the last time I did this, I found the following useful plug-ins for Git and Jenkins: Git Plugin, Git Client Plugin, GitHub Plugin, GitHub pull request builder plugin.)
If you plan to use GitHub, you'll want additional plug-ins; see my GitHub and Bitbucket notes. If you're going to use Bitbucket, which supports a public Jenkins set-up, or even if you're going to use a private Jenkins set-up without telling Bitbucket, see another note on that page (look for "Jenkins and Bitbucket").
Go to Manage Jenkins -> Configure System and scroll down to JDK. Click JDK Installations. Give the JDK a name, something like "JDK 1.6.0" and fill in what JAVA_HOME should be. This is because you cannot endow the Jenkins user with that environment variable, especially if you're running Jenkins inside Tomcat (rather than the dedicated Jenkins Tomcat installation discussed in the first section of this page). The value of this variable should be the full path to your installed JDK (not merely a JRE) ending with the dominant subdirectory, e.g.: /home/russ/dev/jdk1.6.0_38.
If you're like me, your Jenkins build will require ant. If you type, which ant on your host and see no reply, install it:
$ sudo apt-get install ant1.8
You could tell Jenkins where ant lands (or is if it's already there), but I haven't found that necessary.
While in pre-configuring Jenkins, you should have seen all sorts of places where you can improve or fix things as they arise. You'll see similar opportunities in the next section on setting up new projects.
Job is synonymous with project when speaking Jenkins.
In my case, I've set Jenkins up to monitor my Git remotes and kick off a build every time someone pushes something back to remote master branch. Before the build will happen, though, I have to set up a job.
To set up something to build in Jenkins, you create a New Job from the dashboard. An appendix at the end of this page shows you a sample job configuration.
Among all the things that won't be working or that will cause the build to fail are:
From this point on, we'll deal with issues that keep Jenkins from performing or that cause it to fail to build.
Remember, it's not Jenkins that does the cloning. Jenkins is really user tomcat6. Here we're on a server named tuonela where Jenkins is running. We "log in" as tomcat6 (shown below) and do the other things in this illustration:
root@tuonela:~# sudo -s -H -u tomcat6
tomcat6@tuonela:~$ alias ll='ls -l'
tomcat6@tuonela:~$ mkdir .ssh
tomcat6@tuonela:~$ chmod a-rwx .ssh
tomcat6@tuonela:~$ chmod u+rwx .ssh
tomcat6@tuonela:~$ ls -dal .ssh
drwx------ 2 tomcat6 tomcat6 4096 2011-08-10 12:01 .ssh
tomcat6@tuonela:~$ cd .ssh
tomcat6@tuonela:~/.ssh$ which ssh-keygen
/usr/bin/ssh-keygen
tomcat6@tuonela:~/.ssh$ ssh-keygen -t rsa -C "Jenkins uses Tomcat"
tomcat6@tuonela:~/.ssh$ cp id_rsa.pub [email protected]
tomcat6@tuonela:~/.ssh$ vim README.txt
In this subdirectory, there is a key pair generated for Jenkins to be able to
use Tomcat to clone a Git repository. Don't erase or regenerate the private key,
id_rsa, or this will cease working. If you do mess this up, you'll have to
regenerate a new pair, rename id_rsa.pub to [email protected], replace the one in
in gitolite-admin/keydir, and commit it.

    -rw------- 1 tomcat6 tomcat6 1679 2011-08-10 11:15 id_rsa
    -rw-r--r-- 1 tomcat6 tomcat6  401 2011-08-10 11:15 id_rsa.pub
    -rw-r--r-- 1 tomcat6 tomcat6  401 2011-08-10 11:16 [email protected]

Also, do NOT muck with the permissions on this subdirectory. They must remain:

    drwx------   2 tomcat6 4096 2011-08-10 11:21 .ssh

or most applications will not honor the private key here.
tomcat6@tuonela:~/.ssh$ ll
total 28
drwx------ 2 tomcat6 tomcat6 4096 2011-08-12 08:38 .
drwxrwxrwx 7 root    root    4096 2011-08-12 08:38 ..
-rw------- 1 tomcat6 tomcat6 1679 2011-08-10 11:15 id_rsa
-rw-r--r-- 1 tomcat6 tomcat6  401 2011-08-10 11:15 id_rsa.pub
-rw-r--r-- 1 tomcat6 tomcat6  222 2011-08-10 12:01 known_hosts
-rw-r--r-- 1 tomcat6 tomcat6  751 2011-08-12 08:38 README.txt
-rw-r--r-- 1 tomcat6 tomcat6  401 2011-08-10 11:16 [email protected]
tomcat6@tuonela:~/.ssh$ cd ..
tomcat6@tuonela:~$ which git
tomcat6@tuonela:~$ git clone git@localhost:myproject
Cloning into myproject...
remote: Counting objects: 269, done.
remote: Compressing objects: 100% (229/229), done.
remote: Total 269 (delta 83), reused 0 (delta 0)
Receiving objects: 100% (269/269), 14.06 MiB | 8.42 MiB/s, done.
Resolving deltas: 100% (83/83), done.
tomcat6@tuonela:~$ rm -rf myproject/
Actually, the git clone step above did not work until we turned to gitolite-admin to add user tomcat6 and its public key in order for it to be able to clone. For more on this, see Git Administration: Public keys.
Similarly, for MySQL, Jenkins has to be able to reach it. Because a MySQL user need not be an actual user on the host, we'll postulate user jenkins. Initially, we don't have such a user. We'll create it and give it privileges because, for our application, Jenkins needs to run database scripts.
root@tuonela:~# mysql -u jenkins -pjenkins
ERROR 1045 (28000): Access denied for user 'jenkings'@'localhost' (using password: YES)
root@tuonela:~# mysql -u root -p
Enter password:
Welcome to the MySQL monitor.  Commands end with ; or \g.
Your MySQL connection id is 79
Server version: 5.1.54-1ubuntu4 (Ubuntu)

Copyright (c) 2000, 2010, Oracle and/or its affiliates. All rights reserved.
This software comes with ABSOLUTELY NO WARRANTY. This is free software,
and you are welcome to modify and redistribute it under the GPL v2 license

Type 'help;' or '\h' for help. Type '\c' to clear the current input statement.

mysql> GRANT ALL PRIVILEGES ON acme.* TO 'jenkins'@'localhost' IDENTIFIED BY 'jenkins';
mysql> FLUSH PRIVILEGES;
Query OK, 0 rows affected (0.00 sec)
mysql> quit
Bye
If you see this in the Console output of your Jenkins build, ...
BUILD FAILED
Target "Default" does not exist in the project "project-name".
...it's because you failed to specify your default target, i.e.: the ant
target you want Jenkins to build. To fix this, go to your project in Jenkins,
Configure -> Build -> Targets and type in the name of the
target you'd like it to build.
You might see something like this:

To update Jenkins (clicking on this will not usually work), get to the host running it, get root and use Aptitude:
    $ apt-get update
    $ apt-get install jenkins
The actual configuration file is on the path /usr/share/tomcat6/.jenkins/jobs/<project-name>/config.xml. I tried to use the following method, which did not appear immediately to modify the file on the path above (so I also modified that file, but maybe I just wasn't patient enough or, I needed to bounce Tomcat):
You'll need a service for Jenkins to send e-mail notifications when the project build is broken. This doesn't come for free. If it's not already done, you'll see something like...
BUILD FAILED
...

Total time: 0 seconds
Build step 'Invoke Ant' marked build as failure
Sending e-mails to: [email protected]
ERROR: Could not connect to SMTP host: localhost, port: 25
javax.mail.MessagingException: Could not connect to SMTP host: localhost, port: 25;
  nested exception is:
	java.net.ConnectException: Connection refused
	at com.sun.mail.smtp.SMTPTransport.openServer(SMTPTransport.java:1934)
	at com.sun.mail.smtp.SMTPTransport.protocolConnect(SMTPTransport.java:638)
	at javax.mail.Service.connect(Service.java:295)
	at javax.mail.Service.connect(Service.java:176)
	at javax.mail.Service.connect(Service.java:125)
	at javax.mail.Transport.send0(Transport.java:194)
	at javax.mail.Transport.send(Transport.java:124)
	at hudson.tasks.MailSender.execute(MailSender.java:115)
	at hudson.tasks.Mailer.perform(Mailer.java:115)
	at hudson.tasks.BuildStepMonitor$1.perform(BuildStepMonitor.java:19)
	at hudson.model.AbstractBuild$AbstractBuildExecution.perform(AbstractBuild.java:717)
	at hudson.model.AbstractBuild$AbstractBuildExecution.performAllBuildSteps(AbstractBuild.java:692)
	at hudson.model.Build$BuildExecution.post2(Build.java:183)
	at hudson.model.AbstractBuild$AbstractBuildExecution.post(AbstractBuild.java:639)
	at hudson.model.Run.execute(Run.java:1527)
	at hudson.model.FreeStyleBuild.run(FreeStyleBuild.java:46)
	at hudson.model.ResourceController.execute(ResourceController.java:88)
	at hudson.model.Executor.run(Executor.java:236)
Caused by: java.net.ConnectException: Connection refused
	at java.net.PlainSocketImpl.socketConnect(Native Method)
	at java.net.AbstractPlainSocketImpl.doConnect(AbstractPlainSocketImpl.java:327)
	at java.net.AbstractPlainSocketImpl.connectToAddress(AbstractPlainSocketImpl.java:193)
	at java.net.AbstractPlainSocketImpl.connect(AbstractPlainSocketImpl.java:180)
	at java.net.SocksSocketImpl.connect(SocksSocketImpl.java:384)
	at java.net.Socket.connect(Socket.java:546)
	at com.sun.mail.util.SocketFetcher.createSocket(SocketFetcher.java:286)
	at com.sun.mail.util.SocketFetcher.getSocket(SocketFetcher.java:231)
	at com.sun.mail.smtp.SMTPTransport.openServer(SMTPTransport.java:1900)
	... 17 more
Finished: FAILURE
First, ensure Jenkins has the e-mail plug-in. You can install this via Manage
Jenkins -> Manage Plugins -> Available. Search for Email-ext plugin
and click Download now and install after restart (at the very bottom of the
very long page. You can go to Jenkins' plugins subdirectory to ensure it's there:
drwxr-xr-x  6 jenkins users     4096 Oct  9 19:34 email-ext/
-rw-r--r--  1 jenkins users   174730 Oct  9 19:33 email-ext.jpi
Bounce Jenkins and you have it.
Next, choose what service will be used to send e-mail. There are posts Google-able that show you how to do it via Yahoo, Google, etc. I chose to use Linux/Unix sendmail.
root@acme-buildserver:/var/lib/jenkins/plugins# apt-get install sendmail
Last, ensure your Jenkins settings are ready. Go to Manage Jenkins ->
Configure System. Scroll all the way down to E-mail Notification
and set these values (for sendmail).
SMTP Server                   localhost
Default user e-mail suffix    (nothing)
Sender E-mail Address         [email protected]
There's also a checkbox to Test configuration by sending test e-mail to see if it works or you can launch a build you know fails.
What's sweet about Jenkins is that you can go to where it does the build and launch it yourself to see what goes wrong in its environment. This is particularly useful for early builds while you're shaking the bugs out of your Jenkins set-up. This is where you go:
/usr/share/tomcat6/.jenkins/jobs/acme/workspace
...unless, you install Jenkins the modern way (see Debian download for Ubuntu).
/var/lib/jenkins/jobs/acme/workspace
There you'll find a copy of the project Jenkins is continuously building for you. Just type ant. Mind you, if you do this as root, you'll run into a few problems:
Whatever you do as you screw around with stuff to get it working, be super careful that all the subdirectories and files belong to tomcat6 or jenkins (which of these depends on how you installed it and how it's running) have the right ownership and permissions or you'll break normal usage.
| Project name | myapplication |
| Description | The greatest application in the world. |
| Discard old builds name | (checked) |
| Days to keep builds | 7 |
| Max # of builds to keep | 10 |
| Source Code Management | --------------------------------------------------------------------- |
| Git | (checked) |
| Repositories | |
| RepositoryURL | https://russellbateman:<password>@bitbucket.org/russellbateman/myapplication.git |
| Branches to build | |
| Branch Specifier | master |
| Repository Browser | Bitbucketweb |
| URL | https://russellbateman:<password>@bitbucket.org/russellbateman/myapplication/ |
| Build Triggers | --------------------------------------------------------------------- |
| Build periodically | (checked) |
| Schedule | 0 23 * * * (means "build every day at 11pm") |
| Poll SCM | (checked) |
| Schedule | */5 * * * * (means "check every 5 minutes") |
| Build | --------------------------------------------------------------------- |
| Invoke Ant | |
| Targets | -f build.xml (ant build file is build.xml at project root) |
This link is sort of helpful:
Setting up Jenkins to Deploy [...] Applications as WAR Files.
Use scp plug-in: scp plugin. This is a usual Jenkins plug-in thing, Manage Jenkins -> Manage Plugins, etc.
Tomcat has a plug-in, but it's a cumbersome process of hitting the Tomcat manager and uploading via HTTP. Using scp just copies the WAR to the other host's /var/lib/tomcat6/webapps subdirectory.
After installing the scp plug-in and bouncing Jenkins, go to Manage Jenkins -> Configure System to configure the scp target, username and password.
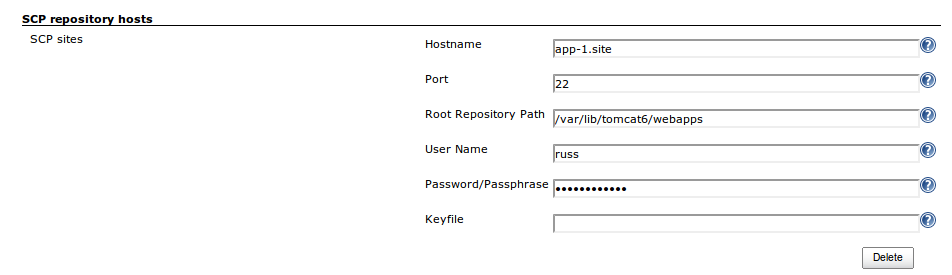
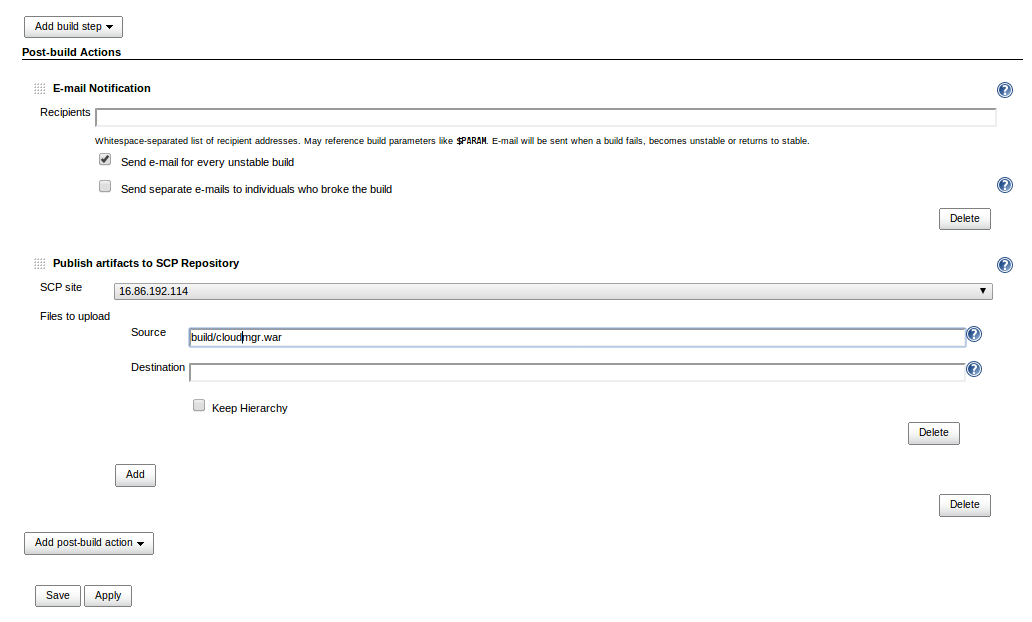
In the post-action section of the application project configuration in Jenkins,
Typically, Tomcat running on the target host will already know it's to explode and deploy WARs as soon as they arrive.
...is permissions to copy the WAR to the destination. The difficulies are adequately supplied by this question in stackoverflow.com and a tentative answer (at the time) given until a real one is offered.
...appears to be the inability to configure targeting of more than one remote server even if already listed in the scp plug-in configuration. See illustration here. Notice how Publish artifacts to SCP repository is greyed out. Also, clicking on Add under the section on publishing artifacts to SCP repository doesn't allow supplying information that fits.
The definitive solution appears to be:
Here's a script example. It copies myapp.war to two application server hosts, app-1 and app-2:
    #!/bin/sh
    # Deploy our WAR to app-1 and app-2.
    scp ./build/deploy/myapp.war jenkins@app-1:/var/lib/tomcat6/webapps
    scp ./build/deploy/myapp.war jenkins@app-2:/var/lib/tomcat6/webapps
And, here's a sample ant invocation:
    .
    .
    .
    <property name="deploy.script"  value="deploy.sh" />
    .
    .
    .
    <!-- == j e n k i n s - b u i l d - a n d - d e p l o y ================ -->
    <target name="jenkins-build"
            depends="test-run,build-war"
            description="Build WAR (Jenkins-only target).">
        <echo message="Jenkins building for deployment..." />
    </target>

    <target name="jenkins-deploy"
            depends="jenkins-build"
            description="Deploy built WAR (Jenkins-only target).">
        <echo message="Jenkins deploying built WAR..." />
        <exec executable="/bin/bash">
            <arg value="${deploy.script}" />
        </exec>
    </target>
    .
    .
    .
For the nitty gritty on setting this up, please peruse the Jenkins parts, here and there, in ESXi Virtual Machine Notes, in particular, Add a Jenkins user and Jenkins user public key set-up.
One day in February, 2013, we updated Jenkins to get some new features via Aptitude on Ubuntu Precise Server. We had Jenkins running as a user with originally, as I recall from having installed it (but I could be mistaken), everything underneath /home/jenkins.
Immediately, all our builds began failing. It appears that two things were awry as a result of the update, which put everything under /var/lib/jenkins instead of the aforementioned user.
    $  git config --global user.email "[email protected]"*
    $  git config --global user.name jenkins
* You may ask why this e-mail address? Uh, what other since Jenkins is at best a user on that Linux host and implies no specific e-mail identity.
I finally became annoyed enough with having to translate out of UTC which Jenkins defaults to that I went in and added this line to /etc/defaults/jenkins:
JAVA_ARGS="-Dorg.apache.commons.jelly.tags.fmt.timeZone=America/Denver"
And bounced Jenkins from /etc/init.d—the GUI won't cut it—I don't know if this sticks or not then next I bounce from the GUI.
If you need to move your existing Jenkins set-up to a new server, this is possible and easier to do than setting it up all over again by hand:
    jenkins@acme-jenkins:~$ ll /usr/java
    total 4
    lrwxrwxrwx 1 root root    11 Sep 19  2012 java6 -> jdk1.6.0_45
    drwxr-xr-x 8 root users 4096 Sep 19  2012 jdk1.6.0_45
export JAVA_HOME=/usr/java/java6
    root@acme-buildserver:~# /etc/init.d/jenkins stop
    Jenkins Continuous Integration Server is running with the pid 1312
JENKINS_HOME doesn't necessarily exist; in the most recent version of Jenkins this is /var/lib/jenkins, which is basically the jenkins user on the hosting platform. See Administering Jenkins: JENKINS_HOME directory.
My newer installation, cira February 2013, appeared thus (compare with Jenkins wiki link above); this is what to archive and move over:
    root@acme-buildserver:/var/lib/jenkins# ll
    total 168
    drwxr-xr-x 12 jenkins adm     4096 Jul  5 18:45 ./
    drwxr-xr-x 44 root    root    4096 Feb 12 22:07 ../
    -rw-------  1 jenkins users   4147 Jul 10 20:35 .bash_history
    -rw-r--r--  1 jenkins nogroup  867 May 15 19:45 be.certipost.hudson.plugin.SCPRepositoryPublisher.xml
    -rw-r--r--  1 jenkins nogroup  225 May 15 19:45 com.cloudbees.jenkins.GitHubPushTrigger.xml
    -rw-r--r--  1 jenkins nogroup 3292 May 15 19:45 config.xml
    -rw-r--r--  1 jenkins users      0 Jun 11 21:56 Connection Activity monitoring to slaves.log
    -rw-r--r--  1 jenkins users      0 Jul 10 03:38 Fingerprint cleanup.log
    -rw-r--r--  1 jenkins nogroup   55 Feb 26 17:37 .gitconfig
    drwxr-xr-x  5 jenkins nogroup 4096 Feb 26 17:47 .gradle/
    -rw-r--r--  1 jenkins nogroup  809 May 15 19:45 hudson.maven.MavenModuleSet.xml
    -rw-r--r--  1 jenkins nogroup  159 Jul  5 18:45 hudson.model.UpdateCenter.xml
    -rw-r--r--  1 jenkins nogroup 1025 May 15 19:45 hudson.plugins.emailext.ExtendedEmailPublisher.xml
    -rw-r--r--  1 jenkins nogroup  321 May 15 19:45 hudson.plugins.git.GitSCM.xml
    -rw-r--r--  1 jenkins nogroup  370 May 15 19:45 hudson.plugins.git.GitTool.xml
    -rw-r--r--  1 jenkins nogroup  173 May 15 19:45 hudson.plugins.gradle.Gradle.xml
    -rw-r--r--  1 jenkins nogroup  567 May 15 19:45 hudson.plugins.throttleconcurrents.ThrottleJobProperty.xml
    -rw-r--r--  1 jenkins nogroup  478 May 15 19:45 hudson.scm.CVSSCM.xml
    -rw-r--r--  1 jenkins nogroup  350 May 15 19:45 hudson.scm.SubversionSCM.xml
    -rw-r--r--  1 jenkins nogroup  145 May 15 19:45 hudson.tasks.Ant.xml
    -rw-r--r--  1 jenkins nogroup  376 May 15 19:45 hudson.tasks.Mailer.xml
    -rw-r--r--  1 jenkins nogroup  132 May 15 19:45 hudson.tasks.Maven.xml
    -rw-r--r--  1 jenkins nogroup   76 May 15 19:45 hudson.tasks.Shell.xml
    -rw-r--r--  1 jenkins nogroup  215 May 15 19:45 hudson.triggers.SCMTrigger.xml
    -rw-------  1 jenkins users   1679 Oct  5  2012 identity.key
    -rw-r--r--  1 jenkins nogroup  261 May 15 19:45 jenkins.model.JenkinsLocationConfiguration.xml
    drwxr-xr-x  3 jenkins users   4096 Jan 25 18:10 jenkins.security.RekeySecretAdminMonitor/
    drwxr-xr-x 21 jenkins users   4096 Apr  8 22:18 jobs/
    -rw-r--r--  1 jenkins nogroup  907 Jul  5 18:45 nodeMonitors.xml
    -rw-r--r--  1 jenkins users     60 Jul 10 19:56 .owner
    drwxr-xr-x 26 jenkins users   4096 Jul  5 18:44 plugins/
    -rw-r--r--  1 jenkins users    175 Jan 25 18:10 proxy.xml
    -rw-r--r--  1 jenkins nogroup   46 Jul  5 18:44 queue.xml.bak
    -rw-r--r--  1 jenkins users     64 Oct  5  2012 secret.key
    drwx------  2 jenkins users   4096 Jan 25 22:46 secrets/
    drwxr-xr-x  2 jenkins users   4096 Feb 26 17:28 .ssh/
    -rw-r--r--  1 jenkins users      0 Feb 25 23:01 .sudo_as_admin_successful
    drwxr-xr-x  2 jenkins users   4096 Jul  9 22:03 updates/
    drwxr-xr-x  2 jenkins users   4096 Oct  5  2012 userContent/
    drwxr-xr-x  8 jenkins nogroup 4096 May 20 23:43 users/
    -rw-------  1 jenkins nogroup 6034 May 15 22:28 .viminfo
    -rw-r--r--  1 jenkins users      0 Jul 10 08:05 Workspace clean-up.log
    root@acme-jenkins:~# /etc/init.d/jenkins start
    Jenkins Continuous Integration Server is running with the pid 1312
...besides sendmail, here are some other that may be useful:
—As already discussed, a JDK is mandatory. I usually download a proper Sun JDK to leave nothing to chance and put it on the path, e.g.: /usr/java/jdk1.6.0_45, then link to it thus (both 6 and 7 shown):
    root@acme-jenkins:/usr/java # ln -s ./jdk1.6.0_45 ./java6
    root@acme-jenkins:/usr/java # ln -s ./jdk1.7.0_25 ./java7
...but it's important to note that you'll want to set JAVA_HOME in Jenkin's profile if not already done:
export JAVA_HOME=/usr/java/java7
root@acme-jenkins:/usr/share $ ln -s ./gradle-1.6 ./gradle
    export JAVA_HOME=/usr/java/java6
    export GRADLE_HOME=/usr/share/gradle
    export PATH=$PATH:$GRADLE_HOME/bin
    root@acme-jenkins:/var/lib/jenkins # su - jenkins
    jenkins@acme-jenkins:/var/lib/jenkins $ gradle -version

    ------------------------------------------------------------
    Gradle 1.6
    ------------------------------------------------------------
    Gradle build time: Tuesday, May 7, 2013 9:12:14 AM UTC
    Groovy: 1.8.6
    Ant: Apache Ant(TM) version 1.8.4 compiled on May 22 2012
    Ivy: 2.2.0
    JVM: 1.6.0_45 (Sun Microsystems Inc. 20.45-b01)
    OS: Linux 3.5.0-23-generic amd64
deb http://downloads.sourceforge.net/project/sonar-pkg/deb binary/
    root@acme-jenkins:/ $ apt-get update
    root@acme-jenkins:/ $ apt-get install sonar
This is a JAR you need to drop )or link) into /usr/share/ant/lib. Download the zip from JaCoCo Java Code Coverage Library, unzip it and copy jacocoant.jar out. Warning: this zip will contaminate the subdirectory into which you unzip it; put it under a new subdirectory, jacoco before unzipping.
Place jacocoant.jar on the path /usr/share/ant/lib in whatever way suits you.
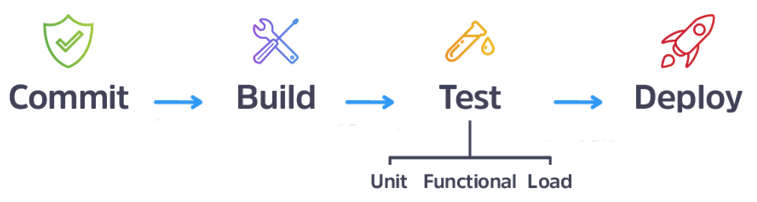
What someone has termed, "the Jenkins spotless house." This delays deployment until after all test phases have run—possibly taking hours. Unit tests only take seconds or minutes whereas functional and, especially, load testing takes potentially much longer.
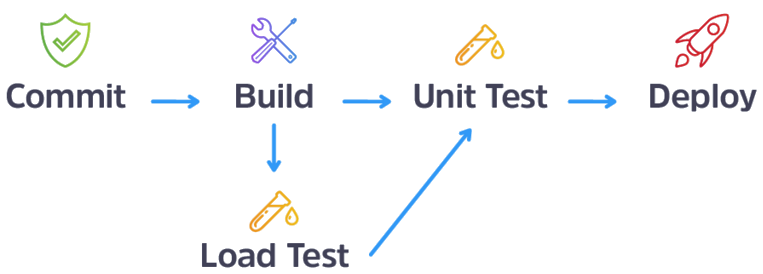
The "clean-enough house" conceived as a way to speed up the workflow by accepting that the load testing, which takes a very long time, will only come in at a later point, probably long after actual deployment.