

Companion Notes on
Eclipse and JavaServer Faces
Russell Bateman
1 March 2010
last update:
|
|
Companion Notes on
|
I decided not to write my definitive JavaServer Faces (JSF) tutorial because Lars Vogel has done a very good job on the problem already. However, I feel Lars has left a bit out of his tutorial, partly to encourage you to think for yourself (that's good), but sometimes you might not be able to follow him in certain places. These are the places I go into detail on here. I also try to make additional productive comments that you might find useful.
You might read this introduction to JavaServer Faces (JSF) to get started.
Pick up and begin Lars' tutorial at http://www.vogella.de/articles/JavaServerFaces/article.html. Return to my notes here when something goes awry. If I had (or anticipated) the same problem, you'll find my notes here on how to solve it. I use Lars' numbering, however, if he ever changes it, then you'll have to look for other ways to link what I'm saying with what is a problem for you in his tutorial.
Much of the time, when you create a new JSP, you should create it by right-clicking the project name and letting Eclipse locate it where it belongs (down under WebContent).
As of this date, the tutorial had been re-written for Eclipse Galileo (3.5).
You'll need both the JSTL API and JSTL Implementation libraries (JARs) from the URL given in the tutorial.
While it may not be too obvious, these are set up later during projection
creation as "user libraries" for consumption via Build Path ->
Libraries. Knowing how to do this is very important, so follow the steps
closely so you can duplicate this thereafter for real development projects.
You can find a tutorial dedicated to this topic here.
Pay attention to creating the project. In subsequent new-project steps, the tutorial will not remind you what you must do. In particular, always choose "JavaServer Faces v1.2 Project" for Configuration. Keep the same Tomcat server each time too.
Warning: If you decide to go to Lars for help over an HTTP 404 status or other problem encountered in his tutorial, he will not be sympthetic to your having changed his project names (which are unexpected for most people, so you may be tempted). Neither would I be in his shoes. When dealing with web.xml and faces-config.xml, names are everything thing. Just use his names and then go back and change them to what you want afterward—dealing with the potential mess you might create.
You may be interested in examining a short essay I've written on web.xml here.
Actually, insufficient information is given here for mystyle.css to make much if any difference. It's not the point of the tutorial to do that, only that this is the moment to insert a stylesheet if you want.
What's missing is a correspondence between what's in the JSP and the stylesheet. You can get some idea by running the application then right-clicking in the content region of the page and choosing View Source. You'll find out what tags actually show up. In the last project, you'll get a better chunk of CSS.
Depending on some Eclipse display settings, you might have trouble getting messages.properties to fall into the correct place. Instead, open the Navigator View and use that to get this file created under de.vogella.jsf.starter.
This is the bit that really tipped me over the edge into writing these notes. Here's how, step by step, to accomplish this. Keep in mind here that I maintain a legacy, Eclipse three-pane workbench, with Project Explorer on the left, the Editor in the middle and the Outline View (and others) on the right of a large wide-aspect monitor.
You must have at least one JSP in order for any of this to work. In order for it to work meaningfully, you must have two JSPs. Better yet, make certain you have created all the JSPs discussed in the tutorial.
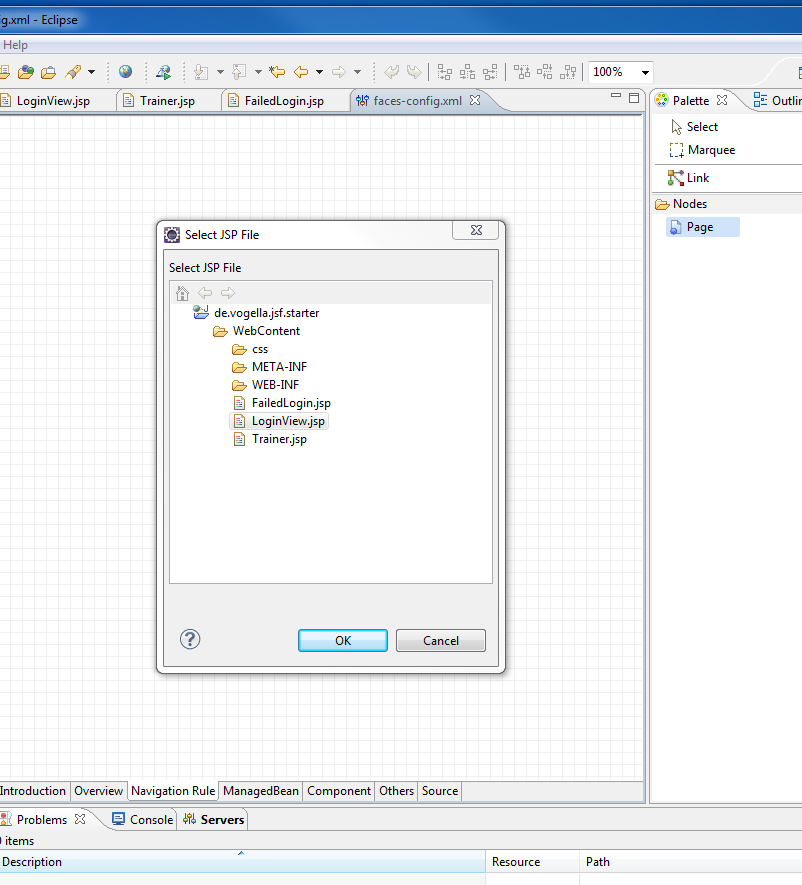
Warning: extra clicks on either icon will create links to that icon. You don't want those. Just press ^Z to get rid of this misstep.
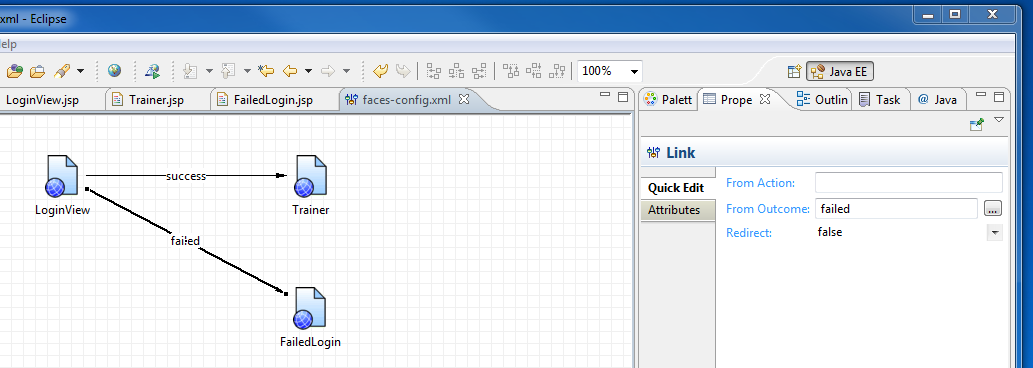
After selecting both JSPs, click on the Properties View tab and then type "success" into the From Outcome: field. Press ^S to save (and, especially, to update the display with the word "success" in the link just created).
At this point, you may not have attempted to run this (second) web application with the Server. You may get an HTTP Status 404 doing so. Just try again and it should clear the problem. I think what's happening is that on the first try, Tomcat hasn't had the opportunity to launch fully. You should see a lot of red-colored status come out in the Console View. These are not errors, but just what Tomcat prints out when it starts up.
Assuming you are able to run, and you try to set a breakpoint in the Login class, you'll notice that if you type a bogus username (one other than "tester"), you never reach your breakpoint. This is despite the code to check against a bad username in Login.java. It is because this is caught already in LoginValidator. Your breakpoint in Login will only be hit if you type in "tester" for the username.
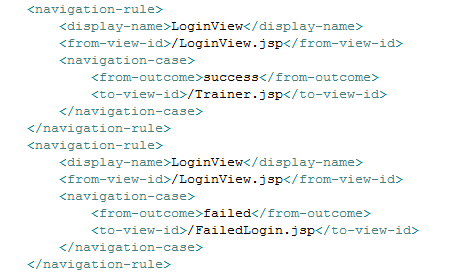
The occluded classname in the illustration (under Initialization) is de.vogella.jsf.card.model.Card. You can verify this is correct by comparing your underlying faces-config.xml source with the snippet given in grey in the tutorial. Afterward, compare the source text of your faces-config.xml with that in the tutorial to ensure correctness.
Again, I have a devil of a time creating messages.properties in the right place unless I use the Navigator View. Eclipse wants to put this file under WebContent.
TODO: Ensure that I'm getting this in the right place and that Eclipse isn't right to be doing this. Lars says to put it on package de.vogella.jsf.card. Is Eclipse telling me that when it comes time to deploy it, messages.properties won't be in the right place?
Remember, the tutorial is trying to make you think and learn here, so it's not going to show you what it's already shown you several times. In this instance, you're going to be doing something identical to section 6.4. Don't forget to add the Initialization information to the Managed Bean tab. The Value field will be #{todo}.
Now you'll get to see what a CSS file looks like in conjuction with all of these JSPs.
You will only see the page the tutorial shows if you click the Add new Todo link.