
Copyright ©March 2008 |
Using the Eclipse Web Tools Platform with Apache Tomcat
Last edit: November 2011 Click here to see this tutorial for NetBeans |
Introduction
This tutorial is Java-, Tomcat- and Eclipse-centric. I make no apologies for that and it narrows my focus enough that I will succeed in what I'm trying to do.
What is the utility of a tutorial on this topic when so many others have written one? The answer is this one is more recent than the others (an advantage that will quickly fade) and it's a place I will refer to personally for links to resources. And I'll be trying to keep it up to date for my own purposes. If you question anything in here, I'd be glad to hear from you. Write me at [email protected].
|
(Eclipse version update: The screen shots illustrating Eclipse installation are pre-Ganymede (Europa). However, I have looked at Ganymede and find it little different from them. Another developer went through this tutorial with Ganymede. Moreover, I have received positive comments on getting this working under Galileo and Helios. One such comment is reproduced in the Appendices.) |
My first attempts at writing a servlet and a JavaServer Page went well because I deployed by hand the many files according to the instructions I was following. I knew, however, that real web developers use Eclipse not only to write code and maintain project structure, but also to produce the deployment artifacts of their applications. I found Eclipse rather intimidating the first few times I tried it. I used IDEs back in the 1980s as a Macintosh programmer (THINKC) and I've used light ones like Codewright and Visual Slick Edit, and heavier ones like CodeWarrior, but I've mostly lived before and after that time in the Unix world. So, I sought out a tutorial to help me learn.
Out of a tutorial I found on eclipse.org that may have worked with the version of Eclipse and WTP for which it was written but with which I had trouble that kept me from completing it, this tutorial was born.
I'm going to do some simple things here in this tutorial, show you step-by-step a working if trivial JEE application, then recommend a number of useful books (see bibliography at end of tutorial) you can invest in to go further. I will also list useful links I've found or used in the preparation of this tutorial.
I'm not teaching anything here, just showing how to get up and running so that you won't be slowed down by this in your effort to learn. It's like a Westerner learning Chinese versus Italian: it's not so much the language itself that's hard, it's what you do the language in that presents the greater challenge. The concepts behind servlets and JavaServer Pages (JSPs) are pretty straightforward; the countless cool things that Eclipse does for you are mind-blowing. But, the interface is huge and sometimes unwieldy for the newcomer.
On my principal development hosts at work and at home, as well as my webserver I run openSuSE Linux, a great platform from System und Software Entwicklung (SuSE) and Novell, Inc., my former employer. However, I'm going to try to pay equal attention to Windows in this tutorial.
I hope you enjoy the tutorial.
Scope and Content
I wanted to set this tutorial up so that it doesn't interfere with anything you've got going elsewhere on your development host—including any of the software listed below. So, whatever you've got on your host will be ignored and we'll download everything from scratch, place and consume it from a single directory anywhere you like (and have access to).
This tutorial will demonstrate performing the following tasks:
Prerequisites
This tutorial assumes a fair command of HTML, web browsing and experience installing software on your platform. It also assumes at least a beginner's command of the Java programming language. Last, it assumes you'll be observing and learning JSP as we go, researching expressions on-line or in books. We use very basic JSP that, if you know Java, will not mystify you.
Software Installation
(Java Developer's Kit, Apache Tomcat and Eclipse)
Performing These Installations on Windows
I work occasionally in Windows, but do little development there. Because it's my understanding that most Eclipse developers run on Windows, I'll follow along to mimic what I do under Linux—including separate installations for these software components so as not to interfere with what's installed already on the workstation. I'll make comments on Windows issues as I go, but only where I observe that the procedure differs from Linux. Most of the screen shots will be done on Windows because I just happen to be writing this tutorial there, so if Windows is your home, I'm hoping you will never feel left out in here.
We'll be downloading all the latest: first the JDK, then Apache Tomcat and finally the Eclipse JEE workbench and tools.

Installing the Java Developer’s Kit
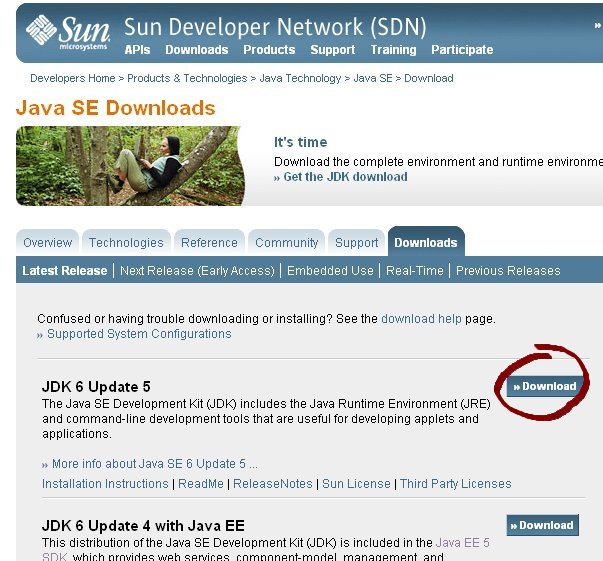
First, we'll download the Java Developer's Kit by clicking on the Java icon here. Then, you'll see a page similar to the one you see on the right (anytime an image is small in the tutorial, you can click on it to see the image normal size). We're looking for the JDK mostly, which I've circled crudely in this illustration.
You've had experience with downloads before; they're more or less likely to meander through questions whose answers will help the web site tailor what you'll get to best fit your needs. Sun may want to know what platform and language for your download. The point is that by the time you read this, the exact steps to get this download (and it's true for all the others we do in this tutorial too), things may have changed. What we want is JDK 6 and Update 5 is proposed, something that changes every few weeks.
As I'm using Firefox on both Linux and Windows, the dialog I get may give me the choice to save the file or execute it directly. I'm going to save it into a new directory I've prepared under my home directory, named tutorial, in which the workings of this whole tutorial will be isolated. I'll click on the “Linux self-extracting file” if on Linux, the Windows Offline Installation, Multi-language on that platform.
Once finished, I change my current working directory to /home/russ/tutorial and I see:
russ@keltia:~/tutorial> ll
total 68923
-rw-r--r-- 1 russ users 70504987 2008-03-06 19:54 jdk-6u5-linux-i586.bin
I'm careful here not to get jdk-6u5-linux-i586.rpm.bin, because to use that download would alter the JRE on my system. If I wanted to develop using Java 4, for example because I needed my application to run on NetWare while Novell never released the Java 1.5 JVM, I might not even be able to run a modern Eclipse or Tomcat afterwards.
Note: If you want to run an older JDK/JRE for whatever reason, you'll want to be careful to get that version down from Sun prior to installing Eclipse.
Note: On Windows, you'll need to decide where to put the downloaded file. I'm going to choose to speak in terms of C:\tutorial, so what is /home/russ in Linux is just the root of my C: volume on Windows.
There I'm looking at the following. Forgive me, I'm an incurable command-line guy, so even on Windows, I've got a console window open with a command-line prompt:
C:\tutorial>dir
Volume in drive C has no label.
Volume Serial Number is B0CE-6693

Directory of C:\tutorial

03/06/2008  07:58 PM    <DIR>          .
03/06/2008  07:58 PM    <DIR>          ..
03/06/2008  07:58 PM        74,868,120 jdk-6u5-windows-i586-p.exe
               1 File(s)    74,868,120 bytes
               2 Dir(s)  97,943,945,216 bytes free
I make this file executable on Linux: it's a self-extracting archive that will open and dump the contents into the current directory:
russ@keltia:~/tutorial> chmod u+x jdk-6u5-linux-i586.bin
russ@keltia:~/tutorial> ./jdk-6u5-linux-i586.bin
The archive self-extracts, I answer an end-user license agreement which launches a browser for me to register with Sun. This is not necessary; just dismiss the browser. Then I have this:
russ@keltia:~/tutorial> ll
total 68924
drwxr-xr-x 10 russ users     576 2008-03-06 20:05 jdk1.6.0_05
-rwxr--r-- 1 russ users 70504987 2008-03-06 19:54 jdk-6u5-linux-i586.bin
The JDK, including a Java Runtime Environment or JRE, is found in the subdirectory, jdk1.6.0_05. To keep the clutter to a minimum, I'll remove the self-extracting archive.
russ@keltia:~/tutorial> rm jdk-6u5-linux-i586.bin
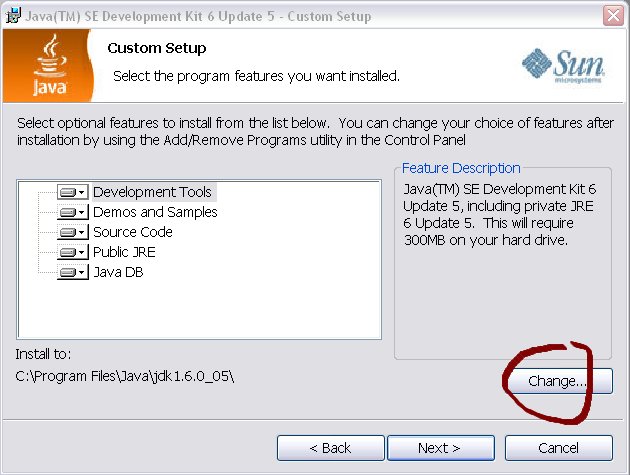
Here, Windows is different because it really wants to install something using Windows Installer, so I have to be very careful. I follow the usual installer pattern taking defaults, but when I get to the dialog to the right where it reveals to me the installation path, I stop because I already have this JDK installed on my system and, for the purposes of this tutorial, I want the files to be dropped into my isolated directory. I don't want to clobber my “normal” installation. Also, because Windows installations work differently from Linux (not creating a subdirectory), I have to create the jdk1.6.0_05 subdirectory in which to install the JDK. I did this by hand in the console window:
C:\tutorial>mkdir jdk1.6.0_05
I click the Change button so that I can redirect where this software will go and the path changes to C:\tutorial\jdk1.6.0_5. After clicking Next, the software installs.
At certain points during our use of Eclipse, we'll be navigating into this directory structure to find the JRE and a library or two. Now let's move on to the Tomcat installation.

Install Tomcat 6, Our Servlet “Container”
The Tomcat download is simpler. Click on the icon here and then down the left-hand side on “Tomcat 6.x”. Scroll down until you see a list of binary distributions (since we don't want to download and build the source code ourselves).
Note: Again, if you want to run an older Tomcat because your target platform cannot support a modern one, you'll want to be careful to get that version down from Apache prior to installing Eclipse.
Advanced note for the future: If you decide to change horses mid-stream, that is, if you opt for an older JDK/JRE and/or Tomcat, it is possible, in theory, to change your projects in Eclipse to do this. There are two places to observe closely when you change JDK versions: the Build Paths -> Libraries -> JRE System Library [version] and Window -> Preferences -> Java -> Compiler. Ensure these are in sync instead of whatever you started with and all should work fine.
Tomcat 7 note: As of January, 2011, there was still a bug in the interaction between Tomcat 7 and Eclipse. If you wish to use this version of Tomcat, you will want to peruse this discussion thread in the Eclipse web tools platform forum.
For Linux, I want the tarball (file ending in .tar.gz). I click on that link and Firefox offers to open or save it. I choose to save it to /home/russ/tutorial just as I did for the JDK. This doesn't take long, but if I look too soon in my directory, I'll see multiple files as pieces are assembled. In a few moments all will disappear leaving only:
russ@keltia:~/tutorial> ll
total 6018
-rwxr--r--  1 russ users 6153560 2008-03-06 21:05 apache-tomcat-6.0.16.tar.gz
drwxr-xr-x 10 russ users     576 2008-03-06 20:05 jdk1.6.0_05
I perform the usual commands familiar to Unix and Linux heads:
russ@keltia:~/tutorial> gunzip -d apache-tomcat-6.0.16.tar.gz
russ@keltia:~/tutorial> tar -xf apache-tomcat-6.0.16.tar
russ@keltia:~/tutorial> rm apache-tomcat-6.0.16.tar
I'm left with just the Tomcat directory (named apache-tomcat-6.0.16) and the JDK subdirectory from earlier because I cleaned up the tar file which I can return to the web to get if I ever need it.
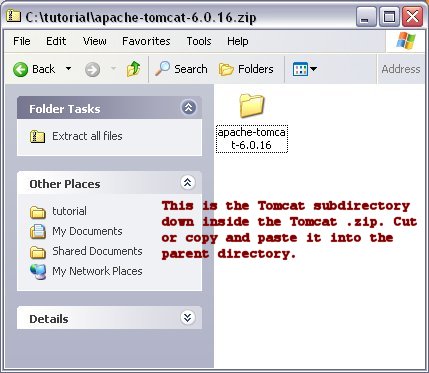
On Windows, I want a .zip file that I can unpack into the right place as you see if you click on the File Explorer window to the right. On the Tomcat page, I found “Core” under Binary Distributions and clicked on the zip link. As Firefox' current working directory was still the same as during the JDK download, I dropped this .zip into C:\tutorial.
Navigating to it in the GUI as you have seen, I entered the .zip file which appears as a sort of folder icon with a belt around it. Then I right-clicked on the folder icon and chose Copy. Next, I clicked on the up-arrow in the button bar above to navigate back out (putting me in C:\tutorial again). I right-click in empty space (in the File Explorer window) and choose Paste as my way of extracting from the .zip. Then I delete the .zip file to keep the clutter down. This is the result (easier than doing another screen shot in File Explorer):
C:\tutorial>dir
 Volume in drive C has no label.
 Volume Serial Number is B0CE-6693

 Directory of C:\tutorial

03/06/2008  09:20 PM    <DIR>          .
03/06/2008  09:20 PM    <DIR>          ..
03/06/2008  09:09 PM    <DIR>          apache-tomcat-6.0.16
03/06/2008  08:24 PM    <DIR>          jdk1.6.0_05
               0 File(s)              0 bytes
               4 Dir(s)  97,515,053,056 bytes free
Now we move on to download Eclipse.

Installing Eclipse 3.3.x for Java EE Developers
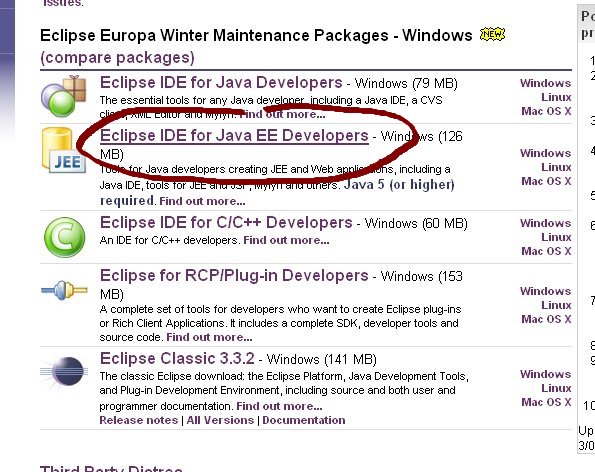
Your first time on the Eclipse Download page can be bewildering. I'll make it easy. We're looking to develop web applications which means Java Enterprise Edition or JEE (which used to be J2EE), hence the name of our package is Eclipse IDE for Java EE Developers. If we were only developing Java applications, we'd chose the Eclipse IDE for Java Developer. If we were developing plug-ins to enhance Eclipse as a tool, we'd choose Eclipse for RCP/Plug-in Developers. See the illustration here as to what to expect on the download page and choose the one circled in red.
Note after Eclipse Ganymede or Galileo: If the version of Eclipse and/or WTP changes, as it doubtless will, you still look at the listed offerings and choose the one for JEE developers. The Web Tools Platform (WTP) that is crucial to what we're doing here will come along for free, although not always the very latest one. Never mind, the one you get might be more stable anyway.
So, click on the Eclipse icon above to get started; follow the instructions you've just read in choosing which package.
To the right of the package name, description with the fancy icon, we see offered downloads appropriate for Windows, Linux and Mac OS X. (Here's where my advice to Macintosh afficionados no longer holds for what to download.) Click on the one appropriate for your host platform. Then pick a download mirror, ostensibly one from your or a nearby country.
On Linux, the name of the tarball downloaded is eclipse-jee-europa-winter-linux-gtk.tar.gz and I do the same things to it that I did for Tomcat. This produces:
russ@keltia:~/tutorial> ll
total 1
drwxr-xr-x  9 russ users     328 2008-03-06 21:55 apache-tomcat-6.0.16
drwxr-xr-x 10 russ users     424 2008-02-28 00:04 eclipse
drwxr-xr-x 10 russ users     576 2008-03-06 20:05 jdk1.6.0_05
On Windows, the name of the file will be something like eclipse-jee-europa-winter-win32.zip and you'll unzip it, then move it up into the C:\tutorial subdirectory just as you did the Tomcat .zip file.
The Web Tools Platform (WTP) Project
The Eclipse Web Tools Platform (WTP) is a champion project that extends Eclipse platform by means of plug-ins for developing Web and Java EE applications. Basically, it gives you a lot of wizards and other help to develop your web application in as complete an environment as possible. It performs the complex deployment of your application. This platform comes with the “JEE” flavor of Eclipse, so we don't need to get it in addition to Eclipse which we've just downloaded.
At long last our three pieces of software are downloaded and we're ready to launch Eclipse on our first project.
First Project: A Simple JSP
(tutorial.jsp)
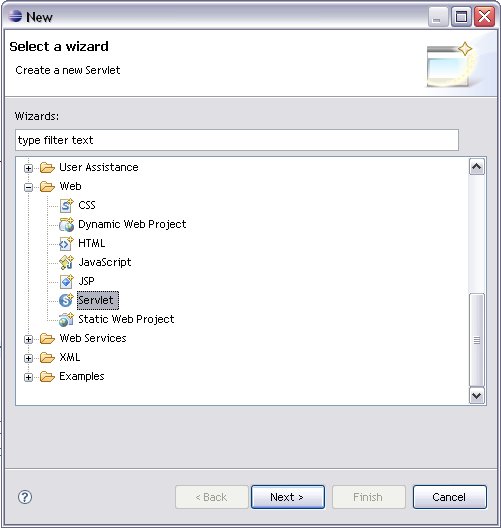
Create a Dynamic Web Project
Now that Eclipse is installed, you'll want to launch it. Remember, you may have Eclipse installed elsewhere or this may be your first installation. Ensure that you get the correct one.
On Linux, I go to /home/russ/tutorial and type
russ@keltia:~/tutorial> eclipse/eclipse&
(I want to be able to use my console window for other things, so I put this
launch into the “background” to free the command line up for
later; hence the & at the end of the command.)
In Windows, you can either launch using the Start Menu's Run As... dialog and file browser, or you can launch it from the command line almost identically to Linux.
One last difference between Windows and Linux: If your workstation has a Java Runtime Environment (JRE) older than 1.5, launching Eclipse may complain that it cannot run on that version—despite that you may also have JRE 1.5 or even 1.6 installed. When I encountered this problem, I simply launched Add or Remove Programs from the Control Panel and removed all Java 1.4 software. I'm pretty certain that nothing I care about is stuck back on that version.
-
At this point, we'll be working in Eclipse and platform differences are either very small or non-existent. We'll no longer separate instructions for Linux and Windows except for the odd observation.
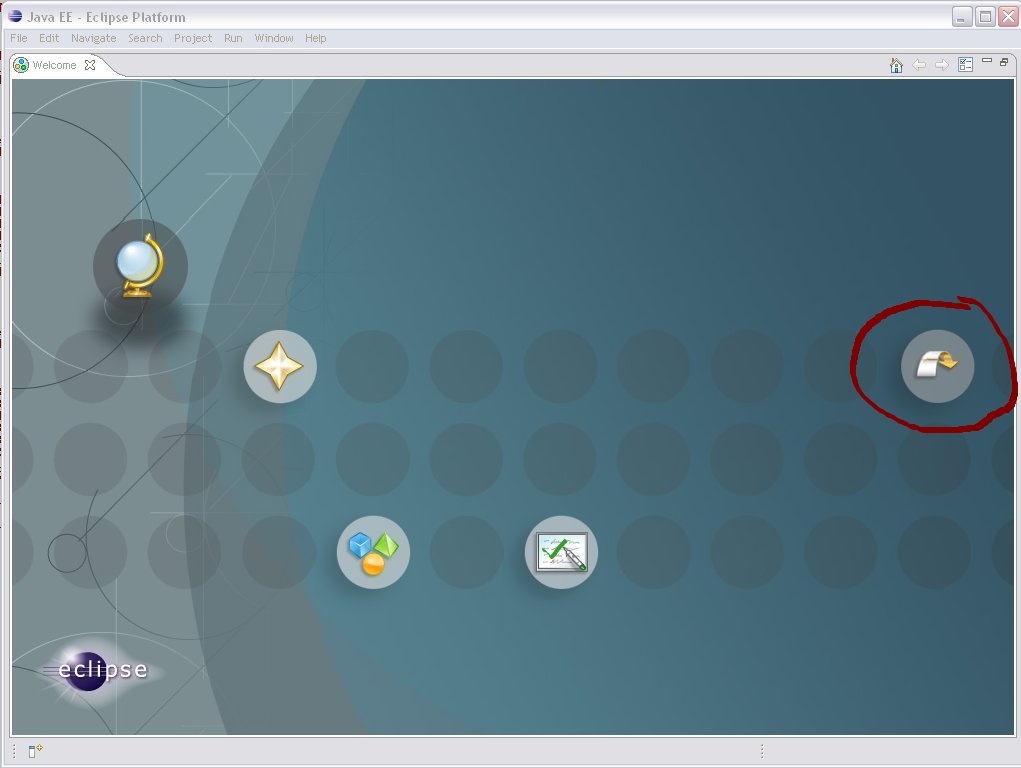
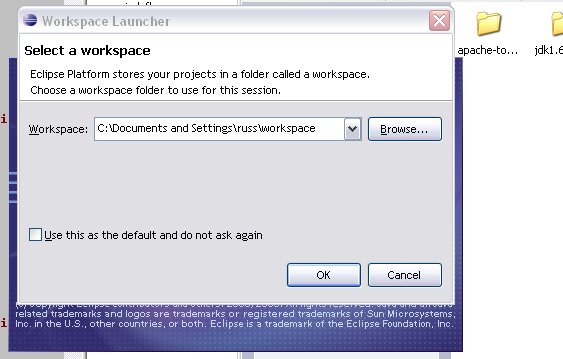
With the Eclipse IDE launched from a fresh installation, you'll see the dialog box pictured below. We must choose a workspace, a directory into which all our Eclipse projects will be placed. I'm just going to choose this tutorial subdirectory I've created. Click on the Browse button and navigate to the directory just above tutorial. Click on tutorial, then click okay until you get the Eclipe IDE splash screen. (To see what this looks like if you don't know, click here. Note that the splash screens look a bit different for Ganymede and Galileo.)
Setting up Eclipse preferences...
At this point, we'll want to go directly into the workbench. Click the workbench button, the one at the right side of the window (circled in red in the previous link to see the splash screen).
The first thing to do is to set up certain preferences we'll have when working in Eclipse. Pull down the Window menu, choose Preferences... and then click on the little + sign next to Java. Then, click on Installed JREs as you see in the graphic below.
On a Linux host, you won't see a + sign in a little box, but a right-facing triangle you can click on to expand the contents of the line. As noted earlier, I'm writing this tutorial and taking my screen shots on a Windows box.
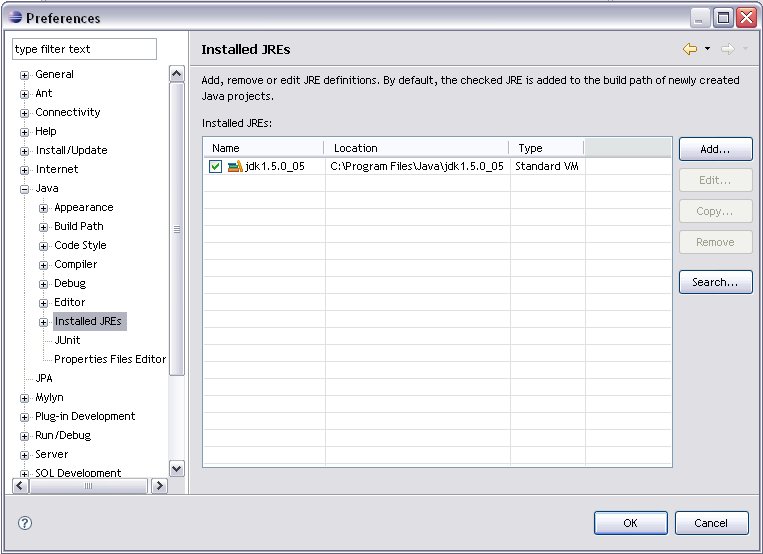
We see that Eclipse has come preconfigured for the JRE in JDK 1.5, probably
because that's what I have on my Windows host. However, I've also downloaded
JDK 1.6 and I want to use its JRE instead. So, click Add... and browse
to the tutorial directory, then click on the jdk1.6.0_05 we
installed earlier. Don't go down into it, but just click OK. After a
few moments, you'll get
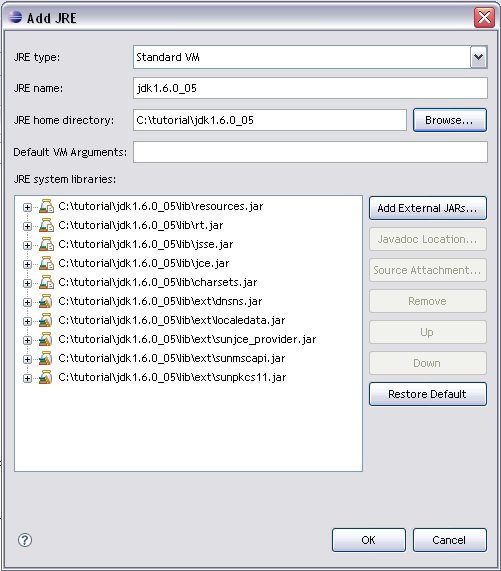
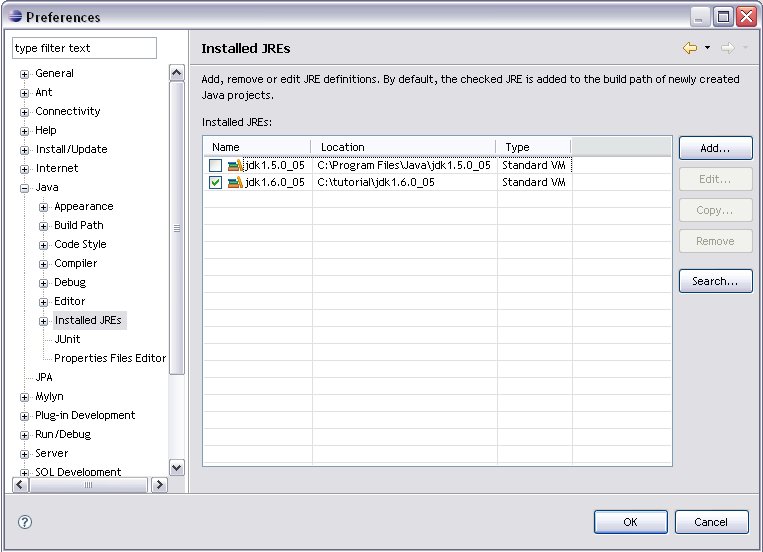
Click OK, then unclick the check box next to jdk 1.5.0_5 shown here (in Linux, it's a longer name that starts with that), then click the check box next to jdk 1.6.0_05. To see what the finished Installed JREs list looks like, click here.
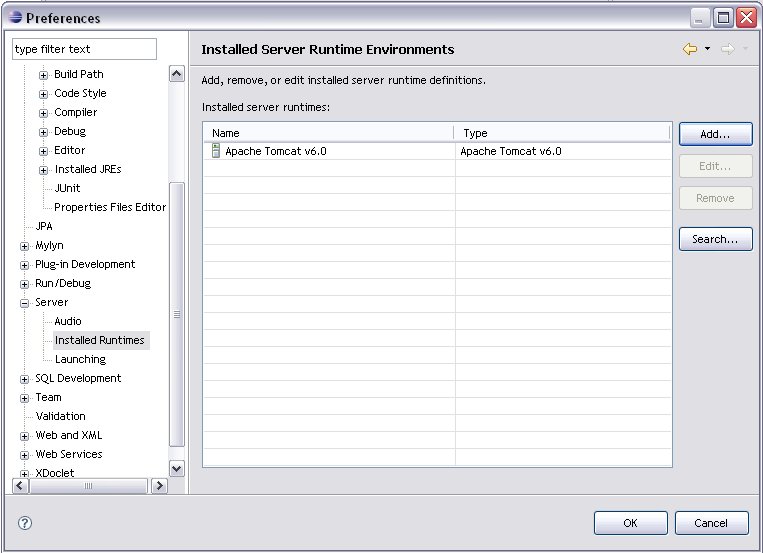
Next, scroll down the left pane of the Preferences dialog to expand the Server preference item. Click on Installed Runtimes. You won't see the Tomcat server installed in the list of Installed Runtime Server Environments, so click Add..., ignore what is immediately proposed by Eclipse, scroll the list up and expand Apache, then click on Apache Tomcat v6.0.

Click Next, then Browse and then click (not double-click) on the apache-tomcat-6.0.16 directory underneath tutorial. To see what the final Server preferences look like, click here.
More Settings: the Project Facets...
Within the context of this tutorial, where you've downloaded everything you need separately from anything you might installed otherwise, you might not have to worry about how some of your project preferences are set, but if you choose differently from the ones you use instead of those I'm showing here (Java 1.6 instead of Java 5, for instance), then you might need to modify some. Click here if you wish to read about this or if you have trouble running the server later in the steps below.
Creating Our Project...
Now, we'll begin our project. You'll note in the upper, left-hand corner of the workbench window that we're in the “Java perspective” (a selected button inscribed, “Java EE”).
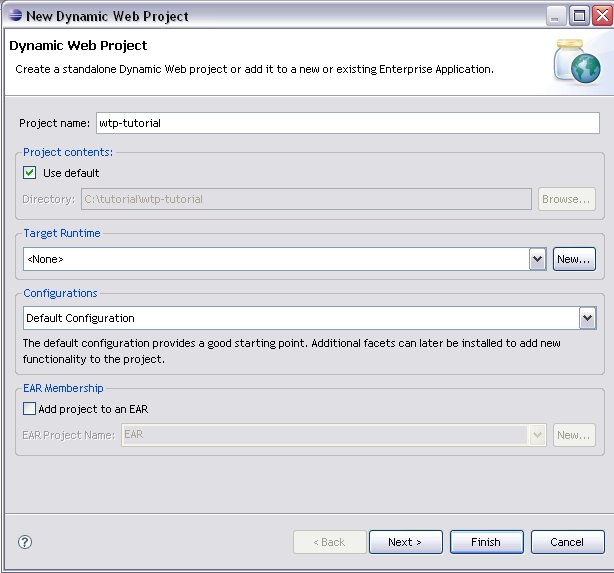
Create a new Dynamic Web Project by right-clicking in the empty white space of the Poject Explorer view at the extreme left of the workbench, choosing New, then Dynamic Web Project.

Now, you'll see the a dialog box in which you can name the project, we're calling it wtp-tutorial. Click on Finish.
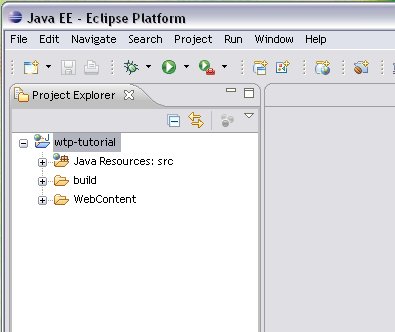
When finished creating the project, Eclipse fills the Project Explorer view with
Create a JavaServer Page (JSP)
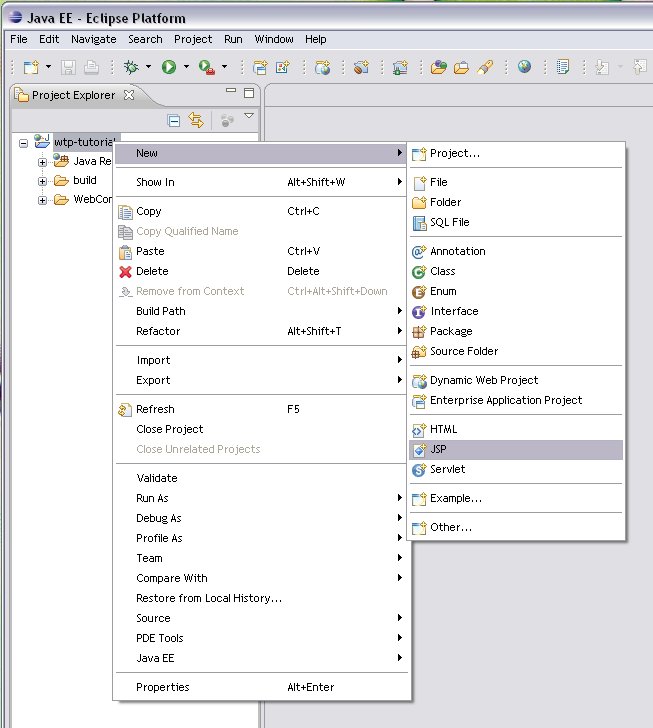
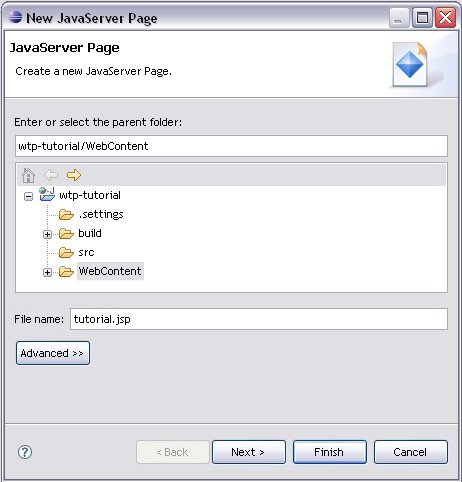
Now we'll create our first JSP. We right-click on our project, wtp-tutorial in the Project Explorer and choose New then JSP. If you need, you can see what this looks like by clicking here. Eclipse knows that the JSP file goes down under the WebContent subdirectory of the project and selects it when presenting you with the dialog box for naming this file. We'll call it tutorial.jsp.
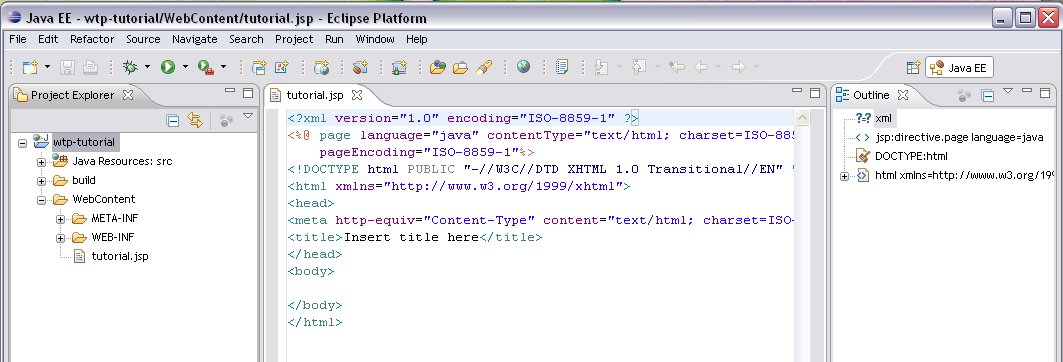
We click Next, then on New JSP File (xhtml) and Finish. Our project now has a JSP file with some default stuff in it. After expanding WebContent in the Project Explorer, we see that the JSP is under WebContent where it should be (Tomcat looks for it there) and the Edit view of the workbench is loaded up with it ready for modification.
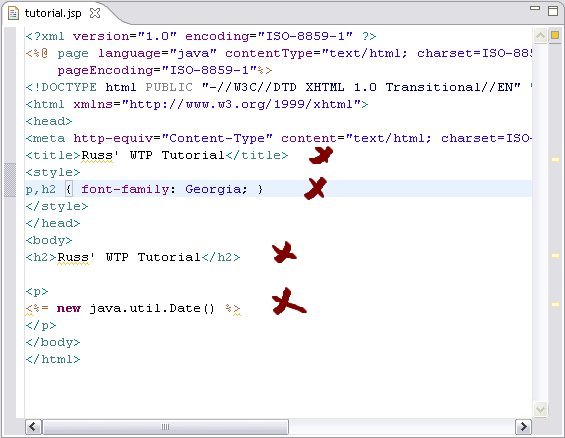
As this JSP won't display much that we can recognize, let's make several modifications to it and I'm assuming here that you read and speak HTML fluently. You will also be introduced to your first JSP content beyond HTML. If you don't understand these instructions, compare the new contents of tutorial.jsp with the original ones displayed earlier (or with your own new copy of this file). Edit the file to do the following things:
- Add a title to the header; mine is Russ' WTP Tutorial.
- Add a style specification to make tags p and h2 use font family Georgia.
- Copy the title and make it a level-2 header inside the document body.
- Create a new paragraph and add the JSP instruction to include the current timestamp. This will cause a call into a Java utility library as the page is being built before sending back to the calling browser.
Here's the result drawing your attention to what I've added by red x's.
Launching the JSP Using the Tomcat Server
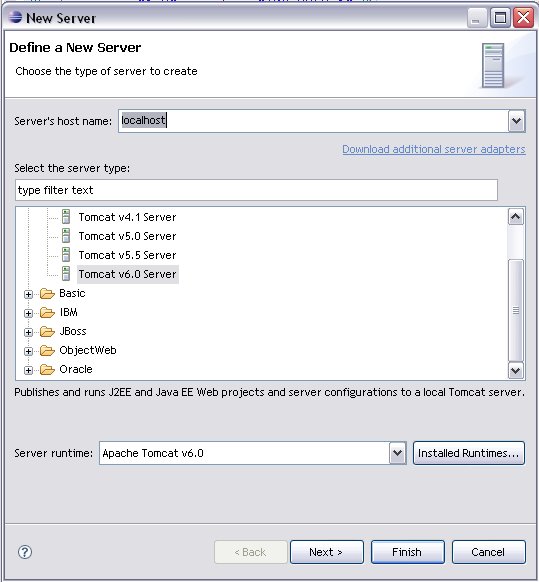
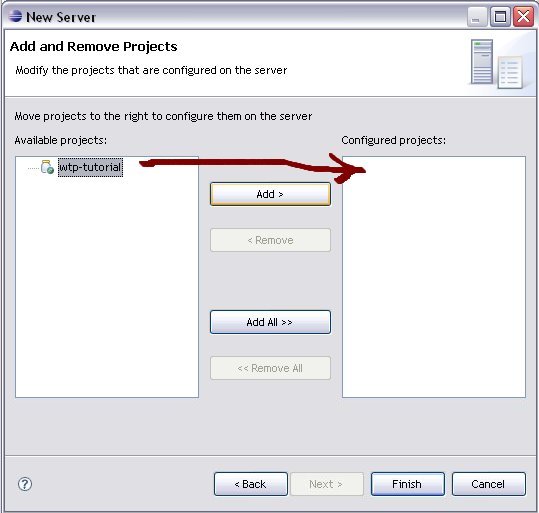
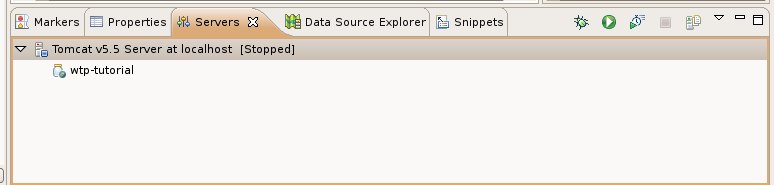
Next, let's get a Tomcat server up and running so that we can try out the JSP. There's a long pane (view) across* most of the bottom of the Eclipse workbench with a tab named Server. Click on Server, then right-click in the large white space, choose New, then Server. You should see the Apache Tomcat v6.0 server already selected (click here to see this). Click Next and associate (or add) the wtp-tutorial project to this server's configured projects (of which there are presently none). The red arrow demonstrates that we're essentially going to move wtp-tutorial from the list of available projects to the configured list.
(* If Server is missing, force it to be displayed by choosing Window -> Show View -> Other -> Server -> Servers.)
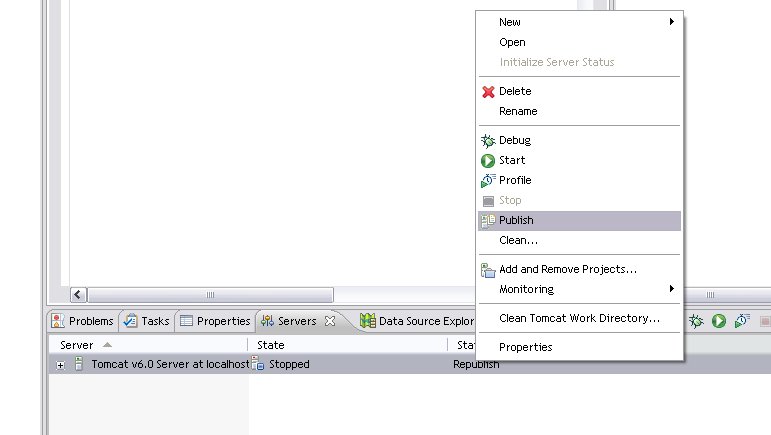
Clicking Finish adds a server to the Server view to the workbench (near the bottom) that is stopped and needs “publishing.” Publishing is an action you need to remember because a) it is important and b) there is a bug (or feature) in this version of Eclipse that makes it so you have to clear then publish every time you make a change to files like web.xml. We'll talk more about that later. For now, right-click on Republish and choose Publish. The status should change to “Synchonized” meaning that Tomcat and Eclipse are ready to talk to each other.
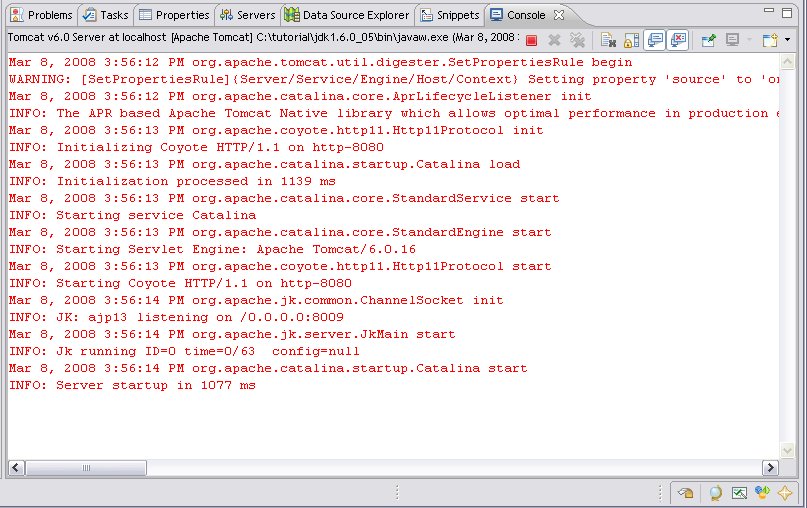
Before we can access our JSP remotely from a browser, we need to start the server. Select the Server view by clicking on the Server tab near the bottom of the workbench where we've just been working. Right-click on Stopped and choose Start. You might notice some red output in the Console view ending with the line, “INFO: Server startup in xxxx ms”. This is normal and indicates that the server has started up successfully.
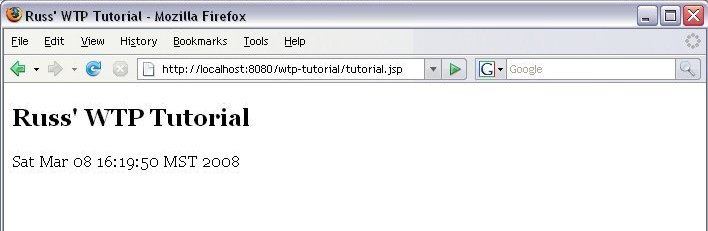
Finally, launch your favorite browser and replace the address line with
http://localhost:8080/wtp-tutorial/tutorial.jsp
Press return to see your JSP file processed by the Tomcat server into an HTML file and transmitted to your browser.
Warning: I found on Linux that I had to close a browser window I had opened before starting the Tomcat server from Eclipse as it wasn't healthy. Then, I relaunched Firefox, typed in the URL above and all worked fine.
What's Been Accomplished?
At this point, after all the software downloads, creating a project and a
server, I have the following directories in my workarea (as seen from a Windows
command prompt and ls -al on Linux tells me I have the same thing):
C:\tutorial>dir
 Volume in drive C has no label.
 Volume Serial Number is B0CE-6693

 Directory of C:\tutorial

03/08/2008  04:37 PM    <DIR>          .
03/08/2008  04:37 PM    <DIR>          ..
03/08/2008  02:49 PM    <DIR>          .metadata
03/06/2008  10:09 PM    <DIR>          apache-tomcat-6.0.16
03/08/2008  02:40 PM    <DIR>          eclipse
03/06/2008  09:24 PM    <DIR>          jdk1.6.0_05
03/08/2008  04:37 PM    <DIR>          Servers
03/08/2008  04:01 PM    <DIR>          wtp-tutorial
               0 File(s)              0 bytes
               8 Dir(s)  97,222,766,592 bytes free
Second Project: A Servlet, HTML Form and JSP
(GreetingAndColorServlet.java, GreetingBean.java,
greet-color.jsp or greet-color.html and color.jsp)
Create a Servlet
Now, you can write an entire web application using one or more JSPs only. There are those who do that, just as there are others who write only servlets that output HTML and don't use JSPs. In this tutorial, we'll strike a balance between the two although trivially since we're not really doing anything.
But why should we use both? There are good reasons and explaining them borders both on theory and religion. They are well tackled in (real) books on the subject that can do a better job than I (see, for example, Marty Hall's volume 1 book in my bibliography which is also available free on-line; see chapter 10). Consider yourself initiated on the topic. It's time to move on.
Before we create our servlet code, let's look at and plan our web presentation a little bit. Because we want to make at least trivial use of a lot of elements of JEE, we're going to present our user a form to fill out. The results of the form will be sent to a servlet and then JSPs.
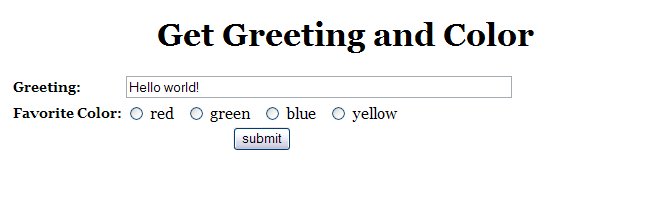
The Form Page
Our form is simple: It will collect a greeting and a color. The greeting starts out with a default using a bean. We'll talk more about this in a moment. This is the result of the HTML form whose code follows.
In Eclipse, you need only right-click on the wtp-tutorial project, choose New, Other..., Web, then JSP. You can also do this with merely an HTML file and forego using the GreetingBean. I decided to use the GreetingBean because, at some point, I'll use the bean to provide persistence in the greeting. Then, when I relaunch, I would get to reuse my same greeting. I'm not showing this here except for the framework in the bean code and in the JSP which uses the bean to get the “Hello world!” greeting initially.
We create a bean because if, when validating the form's request (on a more complicated form), we find something wrong, we'll have to redisplay it to get the bad fields corrected. It would be too bad to send the form back to the user for correction missing the greeting originally typed in (which is correct because it's the user's own, free-form field). In our example, this is totally useless because there's no reason to validate and no reason anything would be amiss. Nevertheless, if you're a beginner like me, you'll probably appreciate the concept's illustration.
GreetingBean.java:
package com.windofkeltia.wtp.tutorial;

/**
 * Tutorial: Using the Eclipse Web Tools Platform with Apache Tomcat
 * This class is a bean that manages persistence for the greeting in the
 * tutorial.
 *
 * @author [email protected]
 */
public class GreetingBean implements java.io.Serializable
{
  static final long serialVersionUID = 1L;

  private String  greeting;

  public GreetingBean()
  {
    // this is the default greeting...
    this.greeting = "Hello world!";
  }

  public String getGreeting()
  {
    return this.greeting;
  }

  public void setGreeting( String greeting )
  {
    this.greeting = greeting;
  }
}
After creating the form (and the bean), I tried it out by launching it in my browser. That's what gave me the figure above. Here's the JSP:
greet-color.jsp:
	<?xml version="1.0" encoding="ISO-8859-1" ?>
	<%@ page language="java" contentType="text/html; charset=ISO-8859-1"
	    pageEncoding="ISO-8859-1"%>
	<!DOCTYPE html PUBLIC "-//W3C//DTD XHTML 1.0 Transitional//EN"
	                      "http://www.w3.org/TR/xhtml1/DTD/xhtml1-transitional.dtd">
	<html xmlns="http://www.w3.org/1999/xhtml">
	<head>
	<meta http-equiv="Content-Type" content="text/html; charset=ISO-8859-1" />
	<title> Greeting and Color Form </title>
	<%@page import="com.windofkeltia.wtp.tutorial.GreetingBean"%>
	</head>
	<body>
	<%-- Tutorial: Using the Eclipse Web Tools Platform with Apache Tomcat
	     Copyright (c) 2008 by Russell Bateman and Etretat Logiciels, LLC.
	     Permission is granted for any non-commercial, derivational use. You are
	     forbidden only to repost the files of the tutorial and project without
	     express permission of the author.

	     This is the form that starts the whole thing off in the second tutorial
	     example. --%>
	<%! GreetingBean greeting = new GreetingBean(); %>
	<h1 class="heading"> Get Greeting and Color </h1>

	<form action="GreetingAndColorServlet"
	      method="post"
	      enctype="application/x-www-form-urlencoded">
	<table>
	<tr><td class="query-prompt"> Greeting: </td>
	  <td>
	    <input type="text"
	          name="greeting"
	          size="60"
	          value="<%= greeting.getGreeting() %>" />
	  </td>
	</tr>

	<tr><td><p class="query-prompt"> Favorite Color:</p></td>
	  <td>
	    <input type="radio" name="color" value="0" /> red
	    <input type="radio" name="color" value="1" /> green
	    <input type="radio" name="color" value="2" /> blue
	    <input type="radio" name="color" value="3" /> yellow
	  </td>
	</tr>
	<tr><td colspan="3" align="center">
	    <p class="query-buttons">
	      <input type="submit" value="submit" />
	    </p>
	  </td>
	</tr>
	</table>
	</form>

	</body>
	</html>
Here is the source to the HTML version. (For the HTML version, it's the same code, but with no JSP statements. These are all the element tags that begin with <%.)
greet-color.html:
<?xml version="1.0" encoding="ISO-8859-1" ?>
<!DOCTYPE html PUBLIC "-//W3C//DTD XHTML 1.0 Transitional//EN"
     "http://www.w3.org/TR/xhtml1/DTD/xhtml1-transitional.dtd">
<html xmlns="http://www.w3.org/1999/xhtml">
<head>
<meta http-equiv="Content-Type" content="text/html; charset=ISO-8859-1" />
<title> Greeting and Color Form </title>
</head>
<body>
<!-- Tutorial: Using the Eclipse Web Tools Platform with Apache Tomcat
     Copyright (c) 2008 by Russell Bateman and Etretat Logiciels, LLC.
     Permission is granted for any non-commercial, derivational use. You are
     forbidden only to repost the files of the tutorial and project without
     express permission of the author.

     This is the form that starts the whole thing off in the second tutorial
     example. -->
<h1 class="heading"> Get Greeting and Color </h1>

<form action="GreetingAndColorServlet"
      method="post"
      enctype="application/x-www-form-urlencoded">
<table>
<tr><td class="query-prompt"> Greeting: </td>
  <td>
    <input type="text"
          name="greeting"
          size="60"
          value="Hello world!" />
  </td>
</tr>

<tr><td><p class="query-prompt"> Favorite Color:</p></td>
  <td>
    <input type="radio" name="color" value="0"> red </input>
    <input type="radio" name="color" value="1"> green </input>
    <input type="radio" name="color" value="2"> blue </input>
    <input type="radio" name="color" value="3"> yellow </input>
  </td>
</tr>
<tr><td colspan="3" align="center">
    <p class="query-buttons">
      <input type="submit" value="submit" />
    </p>
  </td>
</tr>
</table>
</form>

</body>
</html>
If you don't know about HTML forms, I suggest you check out the tutorial at http://www.w3schools.com. Click on “Learn HTML”, then on “HTML Forms”. This is crucial to what we're doing here.
GET and POST Methods
This form is set up to POST its results to something called “GreetingAndColorServlet’. That's the servlet we're about to code.
When I first wrote this tutorial, it was an amalgam of what I was learning by reading several books and other tutorials. I could not get the POST method to work for the longest time.
I had been using this one:
	<form action="GreetingAndColorServlet"
	      method="POST"
	      enctype="text/plain">
...which worked just fine as GET but fetching the parameters from my doPost method resulted in null. The tutorials and book examples were all using GET.
The solution to my problem turned out to be the form's enctype attribute. A friend suggested to me that this might be the problem and I looked at other valid enctypes, in particular, the page at http://www.w3.org/TR/html401/interact/forms.html#h-17.3. Then I chose the one I thought best to try.
	<form action="GreetingAndColorServlet"
	      method="POST"
	      enctype="application/x-www-form-urlencoded">
It's the second one that works. I was mislead by examples that I was comparing and from which I was stealing code. The one I stole from was using the first enctype and getting away with it because it was only using GET. It didn't matter because that works. It would not work as soon as I changed the method to a POST.
Create the Servlet
Now we create our servlet as a servlet. We could create it as a Java class (because that's all that it is), but using the Eclipse wizard to create a servlet will get our deployment file (web.xml) fixed up to recognize it without our having to stress over it. In the Eclipse workbench, right-click on our project, wtp-tutorial, choose New, then Other..., Web and, finally, Servlet.
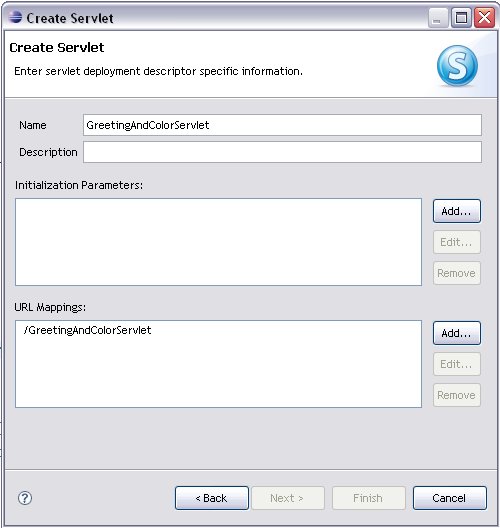
Then we get a series of dialogs which you should fill out as shown with the package name (you don't have to put my domain name, but whatever you put needs to be followed throughout these exercises), a name of GreetingAndColorServlet and specifying the superclass, java.servlet.http.HttpServlet in place of what is there by default (if different).
Click Next to ensure the remaining dialogs look like the images you're seeing here. Take note of the URL mapping in the one—this is what Eclipse is doing for you in the deployment file. It means that your servlet will be hidden in structures underneath your web application root and unfindable by any browser. Your consumer can only be forwarded there via the JSP or HTML form.
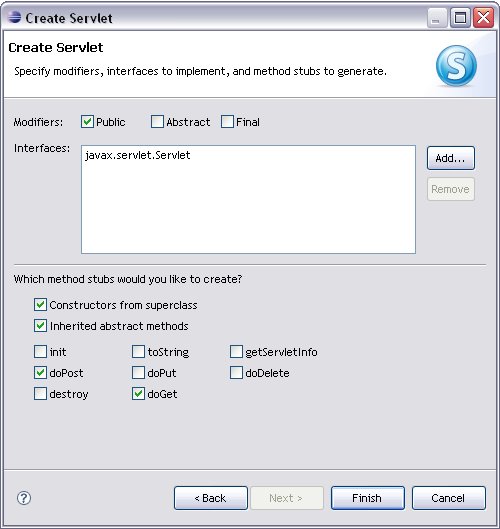
Below, you see that we must check the methods this servlet will offer (the rest are just those inherited from GreetingAndColorServlet's parent class). In particular, we'll choose doPost and doGet. This is because we don't know if the greeting will exceed the limit of doGet's input. This is an important topic that you should learn about by reading in the books and tutorials listed in the bibliography. In particular, because it's available on-line and free, I would suggest chapters 4, 5 and 19 in Core Servlets and JavaServer Pages, Volume 1: Core Technologies.
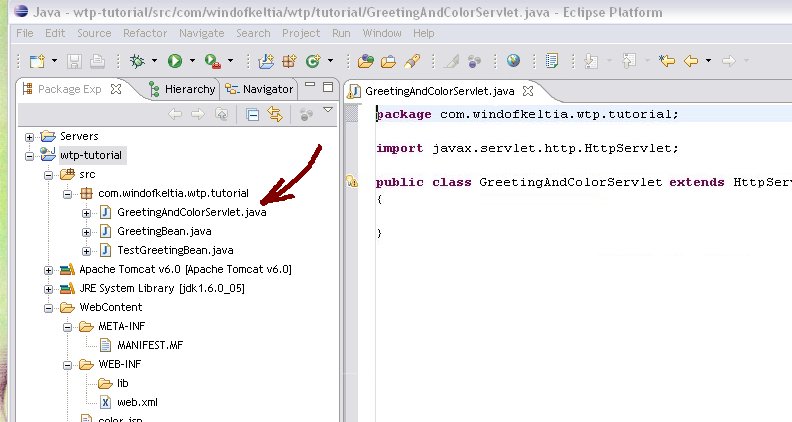
Eclipse creates a new class for us in a file named GreetingAndColorServlet.java in just the right place. Notice first, however, that this file is subsumed by a new element in the Project Explorer view, com.windofkeltia.wtp.tutorial. This is noted by a crude red arrow in the image below.
This is called a package. It used to be that Eclipse created a whole string of subdirectories to walk through, as many as there are elements in the package name, before reaching the class files. It still does in the file system (see the Navigator view), but in the Project Explorer, they are conflated into one so you don't have to click so much.
Next, notice that there might already be a warning to fix in the new class, a version sort of thing (“The serializable class GreetingAndColorServlet does not declare a static final serialVersionUID field of type long.”). This is quickly fixed by adding the following line just after the opening brace of our class:
static final long serialVersionUID = 1L;
But, if you hadn't downloaded Eclipse JEE, you would have other errors to fix. The import statement in the servlet would not work and you'd have to go fetch the Apache Tomcat implementation (in a JAR file) because this import comes from our server (and it's the server that implements the missing class). As this is also a beginning Eclipse usage tutorial, I'll show you how that's done by clicking on this library JAR excursus.
In our case, the JAR is already available. But, we are going to need yet more imports. While they come from the servlet JAR, we still have to name them. In all these are:
import java.io.IOException;
import javax.servlet.ServletException;
import javax.servlet.http.HttpServlet;
import javax.servlet.http.HttpServletRequest;
import javax.servlet.http.HttpServletResponse;
...and we're going to add the method below to our class and combine it with a new JSP to which we'll forward some trivial information just to see how this works. The result will be an application that asks for a greeting and a favorite color. Then, the greeting will be redisplayed in a fancy font on a page whose background has the chosen color.
GreetingAndColorServlet.java:
package com.windofkeltia.wtp.tutorial;

import java.io.IOException;

import javax.servlet.ServletException;
import javax.servlet.http.HttpServletRequest;
import javax.servlet.http.HttpServletResponse;
import javax.servlet.RequestDispatcher;

/**
 * Tutorial: Using the Eclipse Web Tools Platform with Apache Tomcat
 * Copyright (c) 2008 by Russell Bateman and Etretat Logiciels, LLC.
 * Permission is granted for any non-commercial, derivational use. You are
 * forbidden only to repost the files of the tutorial and project without
 * express permission of the author.
 *
 * This is the form that starts the whole thing off in the second tutorial
 * example.
 *
 * @author [email protected]
 */
public class GreetingAndColorServlet extends javax.servlet.http.HttpServlet
  implements javax.servlet.Servlet
{
  static final long serialVersionUID = 1L;

  public GreetingAndColorServlet()
  {
    super();
  }

  protected void doGet( HttpServletRequest  request,
                   HttpServletResponse response )
    throws ServletException, IOException
  {
    int       which = 0;
    String    greeting = request.getParameter( "greeting" );
    String    color    = request.getParameter( "color" );
    String[]  schemes  = {"#FFC6A5", // red
                     "#F7FFCE", // green
                     "#BDC6DE", // blue
                     "#FFFFC6"  // yellow
                     };

    /* This servlet processes a GET or POST coming from greet-color.html. The
     * filled-in values come to us as request parameters.
     *
     * In reading a request parameter, you need to check for the value being
     * a) nil, b) an empty string and c) a nonempty string, but one of the
     * wrong format. Here, we're looking for a greeting (name we gave in the
     * HTML form), but for (c), we don't care because it's the user's greeting.
     */
    if(  greeting == null
      || greeting.trim().equals( "" )
      || false )
    {
      // do whatever for a failed greeting here...
    }

    /* Getting the value of a set of radio buttons is shown here. What defines
     * a set is that they all share the same name (in HTML). You still have to
     * validate as recommended above just in case although in theory you'll not
     * get a bad value back since it's not under user-control.
     */
    if(     color != null
       && !color.trim().equals( "" )
       && ( color.equals( "1" ) || color.equals( "2" ) || color.equals( "3" ) ) )
    {
      /* Convert color to an index here because we're not really going to have
       * red, blue or green as backgrounds--that would be way too ugly.
       */
      which = Integer.parseInt( color.trim() );
    }

    request.setAttribute( "bgcolor",  schemes[ which ] );
    request.setAttribute( "greeting", greeting );

    RequestDispatcher  view = request.getRequestDispatcher( "/color.jsp" );
    view.forward( request, response );
  }

  protected void doPost( HttpServletRequest  request,
                    HttpServletResponse response )
    throws ServletException, IOException
  {
    doGet( request, response );
  }
}
Presentation JSP
Let's add color.jsp. This presentation page must be a JSP because it has to be able to get and display the greeting and color chosen and a simple HTML file has no way of doing that.
color.jsp:
<?xml version="1.0" encoding="ISO-8859-1" ?>
<%@ page language="java" contentType="text/html; charset=ISO-8859-1"
pageEncoding="ISO-8859-1"%>
<!DOCTYPE html PUBLIC "-//W3C//DTD XHTML 1.0 Transitional//EN"
"http://www.w3.org/TR/xhtml1/DTD/xhtml1-transitional.dtd">
<html xmlns="http://www.w3.org/1999/xhtml">
<head>
<meta http-equiv="Content-Type" content="text/html; charset=ISO-8859-1" />
<title> WTP Tutorial </title>
<link href="tutorial.css" rel="stylesheet" type="text/css" />
</head>
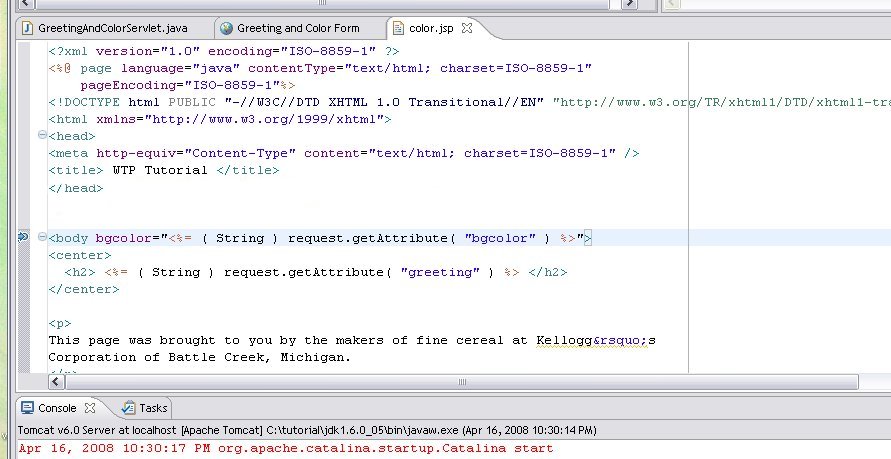
<body bgcolor="<%= ( String ) request.getAttribute( "bgcolor" ) %>">
<center>
<h2> <%= ( String ) request.getAttribute( "greeting" ) %> </h2>
</center>
<p>
This page was brought to you by the makers of fine cereal at Kellogg�s
Corporation of Battle Creek, Michigan.
</p>
</body>
</html>
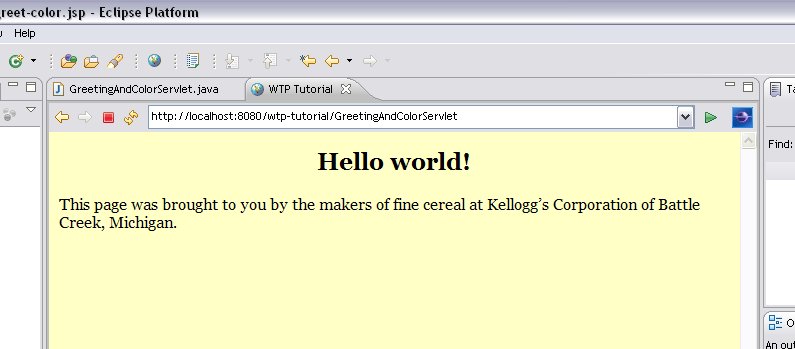
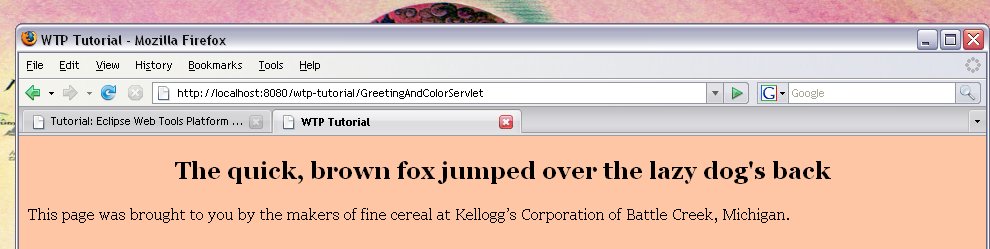
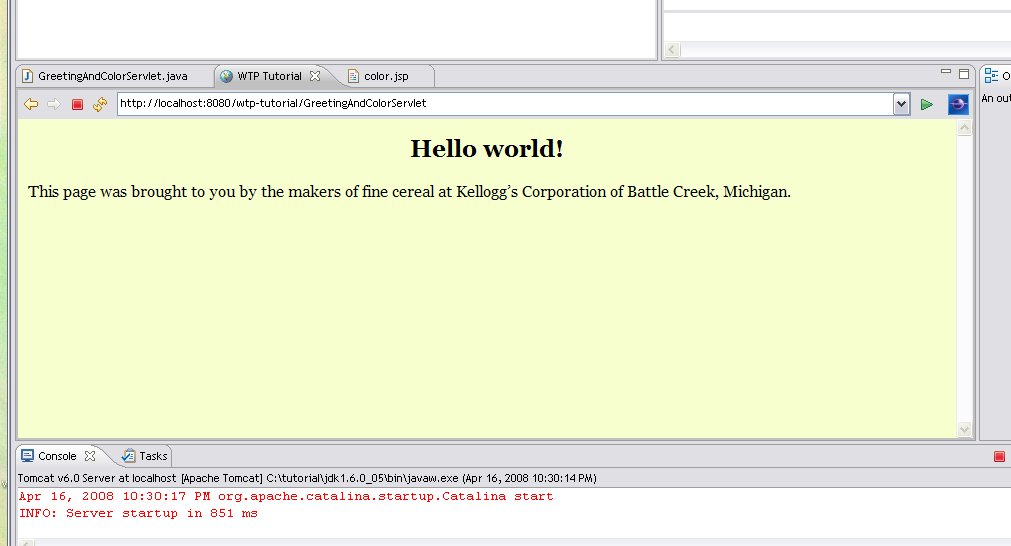
While it seems like cheating, let's see what this page is supposed to look like when we're done. I chose the color yellow when I ran it. The variable elements, as obtained by color.jsp, are the page background color and what is to be displayed as the greeting. To give the page something else to do, I typed in some additional text. This page is shown running in Eclipse's own internal browser.
Deployment (web.xml)
Finally, we adjust the existing deployment file on the path WEB-INF/web.xml by simply adding (or, because we created our a servlet using the servlet wizard instead of the simple class wizard, we just verify that we have):
<?xml version="1.0" encoding="UTF-8"?>
<web-app xmlns:xsi="http://www.w3.org/2001/XMLSchema-instance"
         xmlns="http://java.sun.com/xml/ns/javaee"
         xmlns:web="http://java.sun.com/xml/ns/javaee/web-app_2_5.xsd"
         xsi:schemaLocation="http://java.sun.com/xml/ns/javaee
                             http://java.sun.com/xml/ns/javaee/web-app_2_5.xsd"
         id="WebApp_ID"
         version="2.5">

  <display-name>   wtp-tutorial   </display-name>

  <welcome-file-list>
    <welcome-file>index.html</welcome-file>
    <welcome-file>index.htm</welcome-file>
    <welcome-file>index.jsp</welcome-file>
    <welcome-file>default.html</welcome-file>
    <welcome-file>default.htm</welcome-file>
    <welcome-file>default.jsp</welcome-file>
  </welcome-file-list>

  <servlet>
    <display-name>   GreetingAndColorServlet   </display-name>
    <servlet-name>   GreetingAndColorServlet   </servlet-name>
    <servlet-class>  com.windofkeltia.wtp.tutorial.GreetingAndColorServlet   </servlet-class>
  </servlet>

  <servlet-mapping>
    <servlet-name>   GreetingAndColorServlet   </servlet-name>
    <url-pattern>   /GreetingAndColorServlet   </url-pattern>
  </servlet-mapping>

</web-app>
Deployment is a very complex topic and I suggest that if your needs are greater than what I show here (i.e.: you want to do more hiding of class file names, etc.), you read the chapters on this topic in one or more of the books I list in the Bibliography. For more than what I post here on web.xml, please visit That web.xml mess.
However, here's what I can say.

Tomcat is set up to listen on one or more ports for traffic with its destination. Tomcat runs as a dæmon or separate process on your target host. In our case, this is managed by Eclipse.
The URI (URL) we use to target our servlet is composed of:
- the HTTP protocol designator
- the name of host, in our case, the local computer
- the port Tomcat is configured to listen on
- the path from the application root to the resource required
Protocol and hostname
These should be self-evident or nearly so.
Port
While it's not explicit, you usually browse the web via port 80. This is what Apache or the web server managing the pages you're browsing is listening. So, when you browse this tutorial, you are really browsing http://www.windofkeltia.com:80/j2ee/wtp-tutorial.html, but it is not necessary to specify this.
For Tomcat, this port is 8080, but this is by no means an obligation. This port is specified by the Tomcat server's configuration file on the path $CATALINA_HOME/conf/server.xml, using the port attribute to a <Connector> tag.
If our host were running Tomcat already and using port 8080, we'd have to tell Eclipse to change the port our server is using (from 8080 to something else). We didn't specify this when we created a Tomcat server higher up because it was not necessary.
Path
This element is even more mysterious than the port number. You recognize here the name of the Eclipse project, but you might ask yourself how Tomcat knows where to find the GreetingAndColorServlet.class code which is not directly underneath the project?
The answer is that your project is placed underneath a magic directory belonging to Tomcat, webapps, and so is known by name to Tomcat. Tomcat reads your web.xml or "deployment file" to determine the mapping of names, which can be wild indeed, but here we chose to go with the basename of the servlet class. See web.xml's contents above. The <servlet-class> tells Tomcat where to find the class for the servlet.
Eclipse takes care of much of this for you and therefore also obscures much of the goings on. However, it might help if I explain to you that the WebContent, web, webroot, etc. subdirectory of your Eclipse project "disappears" in deployment and its contents are placed under Tomcat's webapps directory as already noted. (At the time of writing, I note that Eclipse uses WebContent by default, but you may change this during project creation or in Build Paths to anything you like. Just think of this directory as being the root of your web application for conceptual purposes.)
Launching the Servlet Using the Tomcat Server
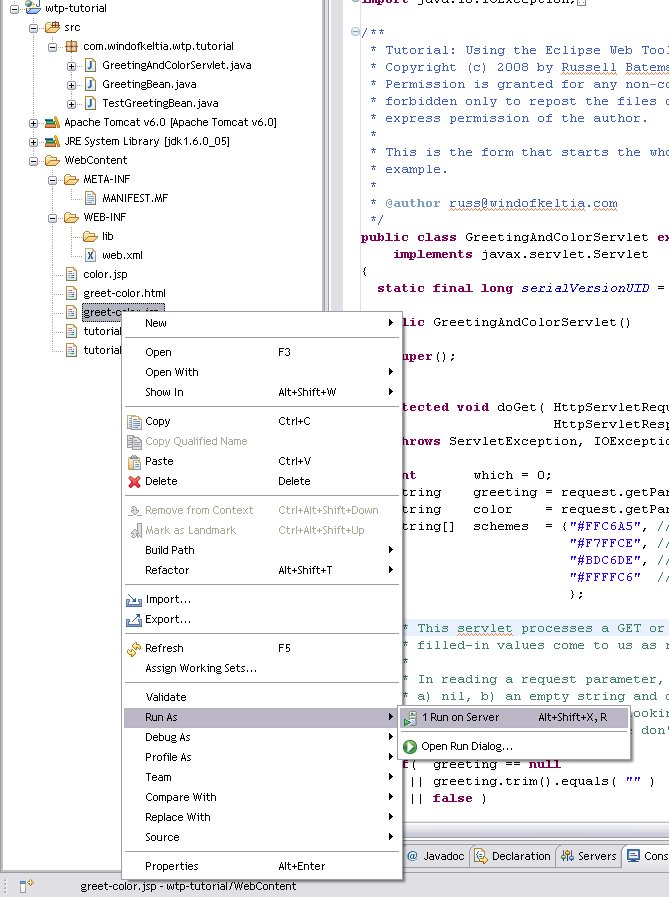
There are two ways we can run our little web application. One is to use our favorite browser. However, this tutorial is about Eclipse, so we're going to use the web browser that comes with Eclipse. It's what will get launched when we launch our application internally. First, right-click on the JSP that starts it all; this is greet-color.jsp (or, you could click on greet-color.html if you're using that approach which can't make use of the GreetingBean).
Note: you should have already run the first project of this tutorial, a JSP page with no servlet. This would have necessitated running Tomcat. It's assumed that all the initial Eclipse/Tomcat set-up was performed then. We're using the same Tomcat server, the one indicated by the dialogs following here and that also displays at the top of the Project Explorer view in the Eclipse workbench (at the top, that is, if you've named the project wtp-tutorial so that it sorts after).
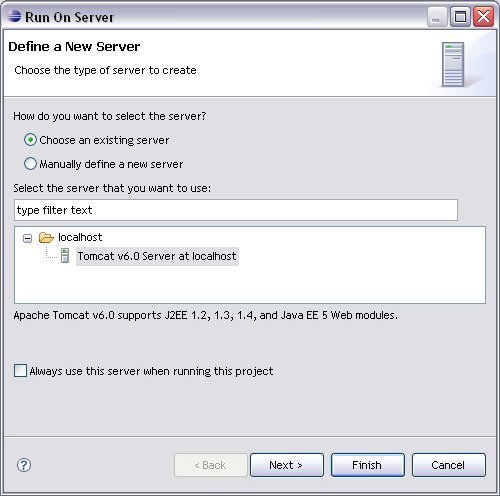
This launches a series of dialogs. They should look like the following set. In this first one, you ensure that the Tomcat server you set up is selected, then click Next.
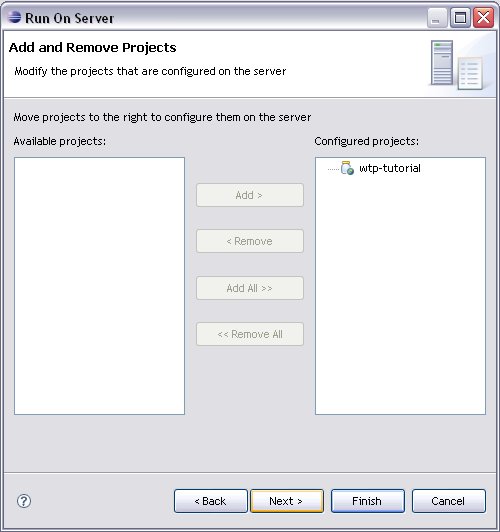
In the second one, ensure that wtp-tutorial isn't sitting on the left-hand side as merely available. Add it to the configured projects.
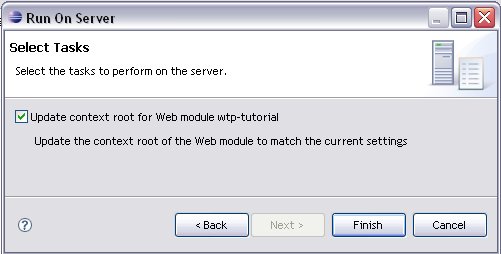
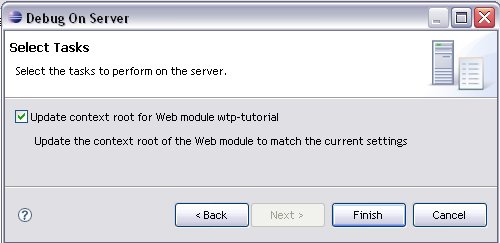
Finally, click to update the context root before clicking Finish. Clicking Finish will launch your server unless another confirmation dialog is needed. You can eliminate much of this interaction by clicking in the dialog check boxes to say “salways do this” (always the same action). Once you've been through this sequence, you can just click Finish.
It's at this point that you should get the dialog entitled Get Greeting and Color, the one I showed you at the top of this section.
By filling in a greeting and choosing a color, you could get a final result such as the one way up above in yellow or the one below in red. The red one was purposely done using Firefox: as long as you have Eclipse running your Tomcat server, you can copy the launch URL (in the address line when you launch greet-color.jsp) into an external browser and everything should work just as in Eclipse.
Debugging the Servlet
Assuming there are problems with this tutorial code, or your Eclipse set-up, your code, etc. you may need to resort to debugging. Debugging with Eclipse is pretty good, though it may be a bit confusing at first. It isn't the purpose of this tutorial to teach all that Eclipse can do or how best to debug your application. However, I can show some of the things that I came to rely on in locating bugs along the way to writing this tutorial.
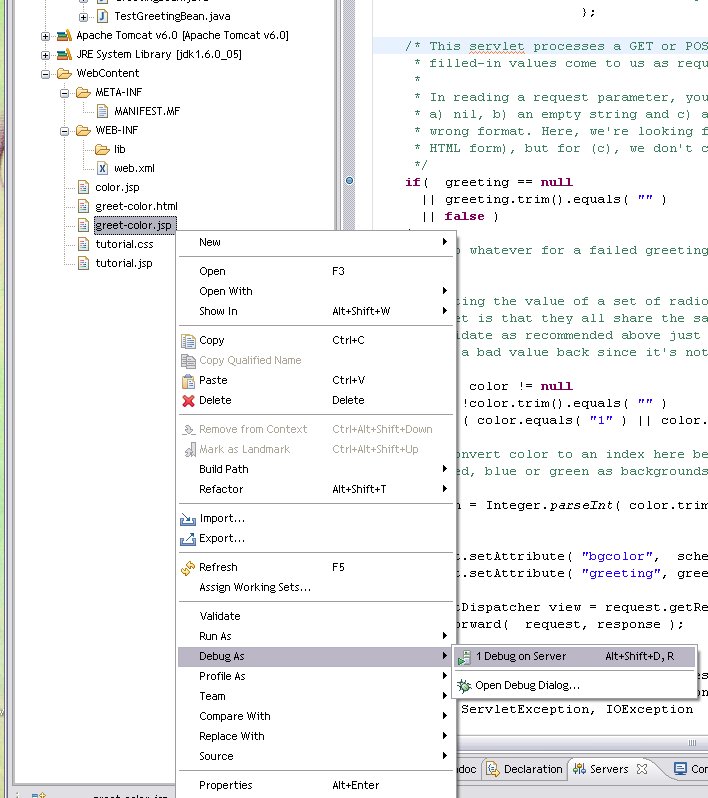
Debugging our application begins pretty much the way running it a while ago began. We launch it by right-clicking on our initial JSP, the one that will display the initial HTML form. This time, however, we choose Debug As and Debug on Server.
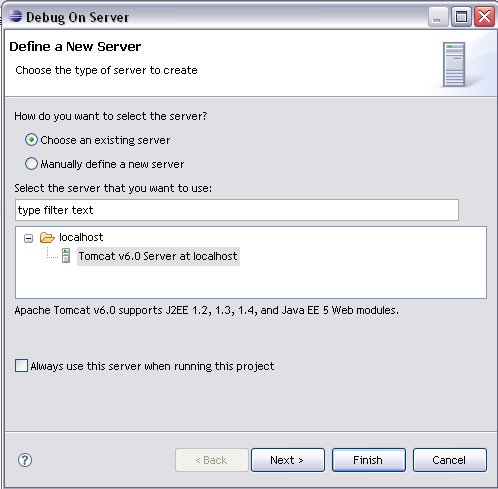
And we choose the same, existing server as before. (I've shortened some of these dialogs in my graphics program to make them smaller so if yours don't look quite like this, don't worry.)
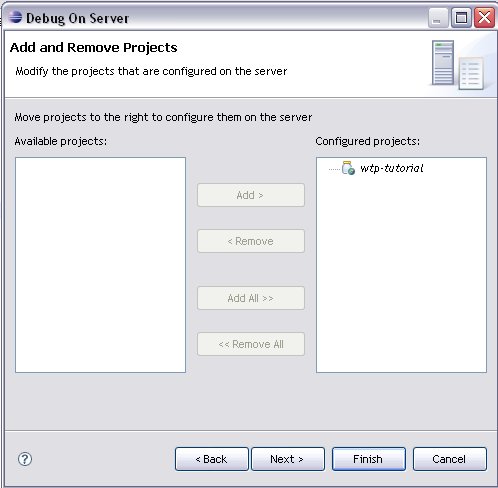
Ensure that the project is among those configured for the server.
Update the context root—all of this is identical to merely running the application. Also, the previous steps could mostly have been ignored by just choosing Finish the first time that option was offered. Again, as for running the server, depending on what checkboxes you've clicked, there are more or fewer confirmations in this sequence.
Methodology for remedying HTTP 404 errors
The most common error to occur when launching a JSP, a JSP that invokes a servlet, a JSP invoking a servlet that creates and passes control to another JSP, etc. is the HTTP 404 or page not found error. This is frustrating and indicative that something is awry in your project or deployment files. Following are things to check in an effort to see what's wrong and fix it. Some are more useful than others as a place to start and it depends on which file is missing as to which solution to begin with.
- - Your servlet is a Java file. However, you should create it using the New Servlet wizard in Eclipse and not simply via New Class. This is because the wizard does much more than create a new class, it also adjusts the deployment (web.xml) file for your application. If you're new at this, rather than muck with the deployment file, just rename (Refactor) your servlet source file to a temporary name, create a new servlet via the wizard, then copy and paste your code into it. Then discard the old, renamed class.
- - Create any JSP files using the New JSP wizard. This wizard is found a little deeper in the New context menu hierarchy, but just look for it under one of the subicons in the list you get when you choose Other....
- - Restart the server manually when running from the Server view. See page 69 of Eclipse Web Tools Platform: Developing Java™ Web Applications. My trick is to perform the following steps:
-
- Stop the server.
- Choose Clean from the context menu (by right-clicking).
- Choose Publish from the context menu.
- Return and run the application by right-clicking on the JSP that launches it.
Finally, we get down to stopping at a point in the debugger. If you were paying attention to my discussion on GET vs. POST and enctypes, you know that at some point along the way, I was stopping in my servlet to watch the greeting and the color get set with values resulting from the HTML form. This is where we are stopped here.
Of course, if you haven't set a breakpoint in your servlet code, the debugger won't stop here. A breakpoint is easily set in the source code editor by double-clicking in the extreme left-hand (grey) margin at the same level as the line you wish to stop on. Eclipse displays a little dot. That point is shown here where, because it's the currently reached point in execution, there is an arrow on top of it and a the line has been shaded in green.
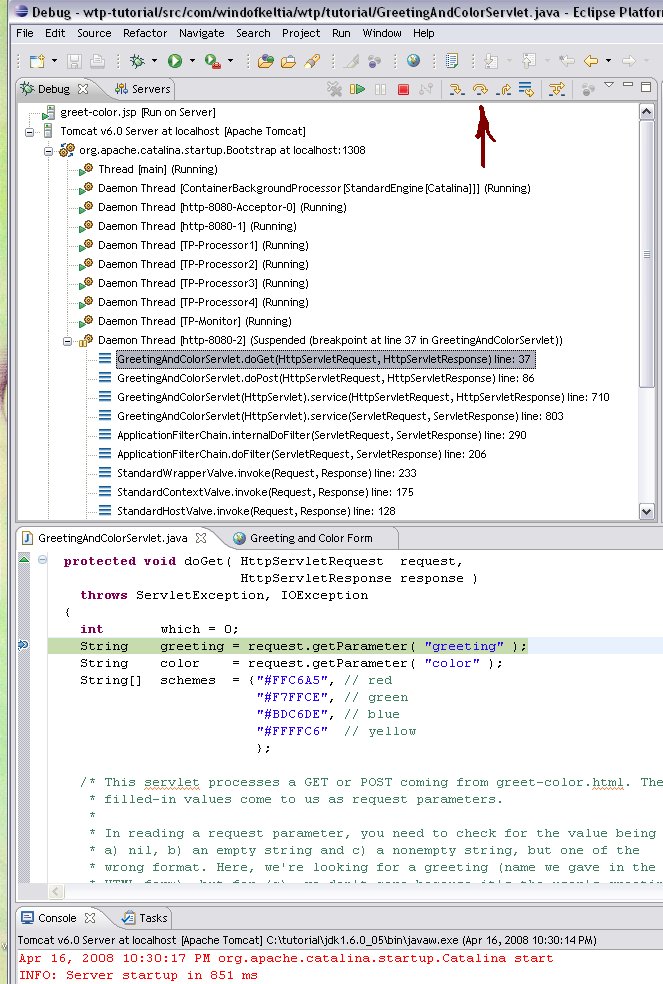
As variables acquire values, they turn up in the Variables tab above if you've left Eclipse to default the Debug View to its own way. When we stopped just now, neither greeting nor color were set.
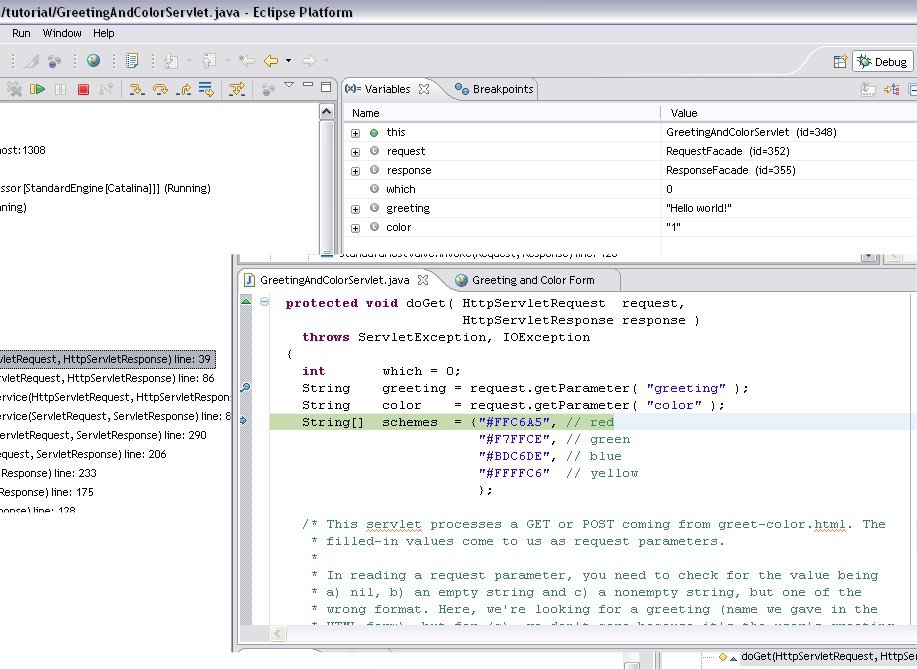
Note: In the image below, note that I've torn off the source code window (GreetingAndColorServlet.java and dragged it up under the Variables window to make this illustration smaller on the page. This isn't exactly something you can do in Eclipse (though you do have a lot of say over where different windows are placed), but something I did in my graphics editor while preparing the tutorial.
Here, we advance past the two lines where the two variables are initialized. We do this by clicking the “over-arching”, yellow arrow on a button bar just a little above and to the left (which I've marked in the previous image with a big, fat red arrow). These controls work the debugger. These controls include, from left to right:
-
 the resume/go button
 the pause button
 the stop/halt button
 the step-into button
 the step-over button
 the step-out-of button
Very intuitive, I think.
Arrived where our two variables are now set, we can examine then by looking simply in the Variables tab above. They are set to "Hello World!" and "1"— exactly what we want.
We can, of course, just click to resume here and let the final page display, but I wanted to pause to speak about GET and POST again.
In servlet theory, you implement these two methods (or one if you know for certain that's all that will ever be used) to accept values from a form (not the only reason to write a servlet, but a real big one) using a mechanism put in place by the javax.servlet.http.HttpServlet class. This mechanism eliminates a lot of the hard work involved in writing to the ancient Common Gateway Interface (CGI)i in which the standard input stream or environment variables had to be parsed with all sorts of difficulties for special characters and the like.
Presently, you simply call request.getParameter with the name of the form setting that interests you and it is magically yours.
These parameters are string that must be translated to whatever format interests you. Here, I translate color to an integer to use as the subscript of an array of HTML background colors to use on my final page.
Next, I massage this data and ready two attributes that I can use to set in the request for passing on to the presentation JSP, color.jsp. I show the code here that does it; it's in the source code for the servlet.
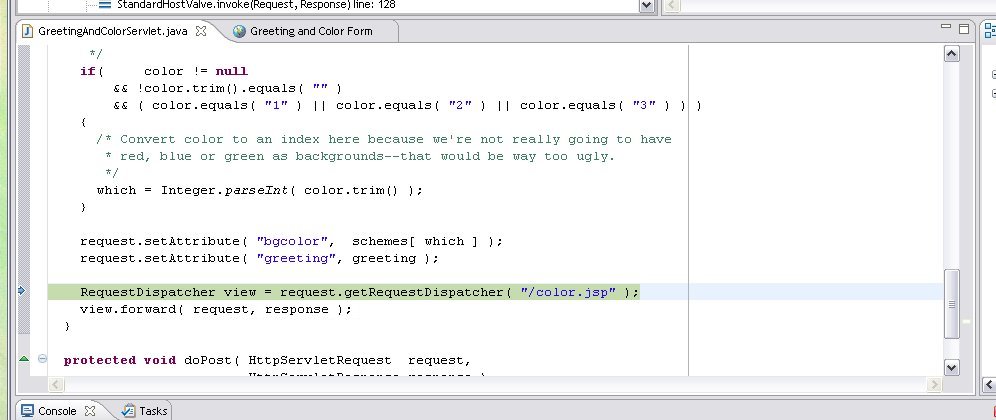
Last, mostly to show that it can be done, I have set a breakpoint in my presentation JSP where I use a JSP expression to dig the background color attribute I set in the servlet out for use in generating the HTML output. JSPs are special files that create a servlet that creates HTML output on the fly without requiring much or any actual Java coding. JSPs are easy for HTML authors to create and maintain especially if they already have JavaScript experience (and are used to algorithmic coding).
Finally, the output. I chose yellow as my background this time.
The way JavaServer Pages work is that Tomcat generates a servlet underneath from your JSP code. That's what's really being executed. Sometimes, in frustration at least, you might want to debug that source code. It's sort of possible. Please see this FAQ.
Conclusion
I hope this tutorial helps give you a leg-up into the world of web applications programming. I confess I was more exacting and attentive when I began writing it and may have begun skipping certain details near the end. If you have questions on any of this or, especially if you have found something that doesn't work, please contact me. I'll be glad both to fix the problem in the tutorial as well as to answer your question if I can. I am a beginner at this, so there's little to be expected, but I'll do what I can.
Appendix A: Bibliography
You may ask why I have some very old ones here. It's because I've had some a long time and they have helped me understand the beginnings of JEE programming and its evolution into what it is today. I don't suggest computer science anthropology for everyone and I do throw books away after a while.
Books on JavaServer Pages (JSP) and Writing Servlets
-
Subrahmanyam Allamaraju, et al., Professional Java Server Programming, J2EE 1.3 Edition, 2001, 1248 pages, Wrox Press, Birmingham, England.
-
Art Taylor, J2EE and beyond, 2003, 1032 pages, Prentice-Hall, Upper Saddle River, New Jersey.
-
Bryan Basham, Kathy Sierra and Bert Bates, Head First Servlets & JSP™, 2004, 854 pages, O'Reilly Media, Inc., Sebastopol, California.
- Great book to prepare for Sun certification, but very questionable for learning this material, though of course, it's easy to follow even as a beginner because of the Head-First format (I know, I read it as a beginner). Too, there is apparently a new edition due out soon.
-
Marty Hall and Larry Brown, Core Servlets and JavaServer Pages, Volume 1: Core Technologies, Second Edition, 2004, 691 pages, Prentice-Hall, Upper Saddle River, New Jersey.
- This book is actually available free on-line (and in color) from here in addition to the black and white paper edition. I think it's a good place to begin.
-
Naci Dai, Lawrence Mandel and Arthur Ryman, Eclipse Web Tools Platform: Developing Java™ Web Applications, 2007, 752 pages, Addison-Wesley Professional.
- Click on source code examples for a .zip file download, on errata for corrections to the book, etc. Very nice site. This is not a reference book, but a great concepts book. It explains the history and rationale behind WTP, but gives also a solid grounding on WTP concepts. Check out chapter listings for it on Amazon. Chapter 3 covers the information given in this tutorial and a bit more, however, it's much harder to follow and is already a year old. It does walk you through debugging a JSP which I do not do here. It also tackles the Eclipse Data Tools Platform (DTP) which I sort of got working for the example given although I ended up using MySQL after failing to get Derby to work.
-
Marty Hall, Larry Brown and Yaakov Chaikin, Core Servlets and JavaServer Pages, Volume 2: Advanced Technologies, Second Edition, 2008, 712 pages, Prentice-Hall, Upper Saddle River, New Jersey.
- Click here for the source code download as .zip or individual files.
Books on JavaServer Faces (JSF)
-
David Geary and Cay Horstmann, Core JavaServer Faces Second Edition, 2007, 723 pages, Prentice-Hall, Upper Saddle River, New Jersey.
- Click here for the source code download and other resources for this book. Click here for a treatment on how to set up the source code in Eclipse.
-
Kito Mann, JavaServer Faces in Action, 2005, 702 pages, Manning, Greenwich, Connecticut.
- Click here for the source code download and other resources for this book. This may be the definitive book on JSF. I had some trouble with the early tutorial in it and resorted to Tong's excellent book.
-
Kent Tong, Essential JSF, Facelets & JBoss Seam.
- Self-published on-line, but soon to be available on Amazon. This is a very practical book (and I know, I've bought all these books in desperation to learn this stuff). I strongly suggest this book because, while I did have a some trouble here and there getting through this book, it was very minimal and I think always my fault. The other books' examples are older, not always accurate and prone to failure for these reasons. I made some notes while going through this book which you can find at http://www.windofkeltia.com/j2ee/tong.html. These notes aren't yet terribly well organized, but there's useful stuff in them if you're going through this book.
Appendix B: Other, Related Tutorials and Additional Resources
I found other tutorials that cover similar material. Why did I write my own? First, I have a peculiar way of learning that's very visual, so it's helpful to me for assimilating the concepts to write this. Second, I resolved to write this tutorial after being stumped for over a week on a very simple problem that the tutorial I was trying out completely disregarded. It was old; it was for a different version of Eclipse; and it made some assumptions that, in the case of someone very new to Eclipse and/or Tomcat, don't hold. I have noticed other tutorials make similar mistakes. However, other tutorials will give you things I am not prepared to give you. So I'm listing all that I have stumbled upon here.
If you know of one that's good, alert me to it and I'll add it here too.
JSP and Servlets, Eclipse, etc.
- Guru99, 2017. Extensive, exhaustive and more modern tutorial on servlet and JSP development.
- Lars Vogel, 2008-2010. Recent, excellent tutorial on servlet and JSP development that has received edits and updates to Eclipse 3.5. It also covers the use of WAR files which my tutorial does not do.
- Naci Dai, December 2004. I've been told this tutorial was written pre-WTP. WTP has made a lot of progress since then.
- Build a class scheduling application, by Lawrence Mandel, January, 2005. A very ample application, I haven't tried this one.
- Lars Vogel. At the end, he lists a good dozen or so other tutorials he has authored.
- ArcTech Software, LLC. Several tutorials for sale and a free one introducing Eclipse.
- Dexter Cowley's amazing video tutorials ...on the Eclipse workbench.
- EclipseWorld 2005. Presentation on web application development with WTP (PDF).
- Beginning and Intermediate-level Servlet, JSP and JDBC Tutorials by Marty Hall.
- Web Tools Project Tomcat FAQ.
- Eclipse newsgroups home. Look for “By Topic”, eclipse.webtools for answers to questions others are having at the same time as you. Create an account and ask your own.
JSF and Facelets
- My helper notes on a (very good) tutorial on JavaServer Faces (JSF).
- A tutorial on JavaServer Faces (JSF) using Eclipse, Raghu Srinivasan, May, 2006.
- Another JSF tutorial from software shop, Exadel.
- Yet another JSF tutorial. Laliluna advertises Java tutorials and development in Hibernate, Struts, JSF, Tomcat, JBoss, Myeclipse, Eclipse and others.
- JavaServer Faces HTML tags reference.
- Presentation by Marty Hall on JSF.
- Jacob Hookom's Inside Facelets tutorial, part 1 and part 2. These are from August and September 2005—a great introduction to Facelets.
- JSF Central: JavaServer Faces community. In general, this is a primo JSF site, also for facelets and Seam.
Appendix C: Experience on Galileo under Ubuntu
Rick Curry sent me this account in July, 2009 after working with this tutorial. Here is his experience in his words.
I'm currently running Ubuntu/Debian. I had used Synaptic (a GUI wrapper on top of apt, the software installation and configuration tool for Ubuntu) to previous install Java and Tomcat which affected my setting of preferences.
In my case, the server type was 5.5 and the standard installation directory for Tomcat is /usr/share/tomcat5.5 (in the preferences.) It was probably impossible for Eclipse to have ever worked there, but running Eclipse with root (sudo) permissions did not accomplish anything beyond putting root-owned files in ~/workspace that I needed to clean out by hand!
The latest Java came up in the configuration, so I didn't need to go hunting around for it. The default location for the Sun JDK/JRE (not some bizarre Debian only version!) is /usr/lib/jvm/java-6-sun-1.6.0.14. The Debian install of Java creates a generic link to the latest 1.6 java, which saves the effort of reconfiguring every time Sun publishes and automatically installs the latest update. This automatic update may or may not be desired! The generic directory is at: /usr/lib/jvm/java-6-sun and this is working for me.
The Galileo version of Eclipse comes up to a splash/welcome screen which must be closed before the 'java perspective' is shown:
The welcome screen can be displayed again, if desired, via
Help->Welcome.
When the server is added to the first project, it does not say anything about publish or republish. It looks like this:
After publishing, it looks like:

This was the point where it became obvious to me that using the Synaptic-installed Tomcat server had completely messed me up and there was very little point in continuing to bang my head against a wall. So I downloaded the real server, as you suggested initially, and dropped it in a local directory.
Then I had a new issue: I was unable to run Tomcat 6 from Eclipse because the ports were in use. I found that all I needed to fix this was to edit the file apache-tomcat-6.0.20/conf/server.xml and add 1 to all the port numbers. This is the diff of the before and after:
22c22
< <Server port="8006" shutdown="SHUTDOWN">
---
> <Server port="8005" shutdown="SHUTDOWN">
67c67
<     <Connector port="8081" protocol="HTTP/1.1"
---
>     <Connector port="8080" protocol="HTTP/1.1"
69c69
<                redirectPort="8444" />
---
>                redirectPort="8443" />
88c88
<     <Connector port="8010" protocol="AJP/1.3" redirectPort="8444" />
---
>     <Connector port="8009" protocol="AJP/1.3" redirectPort="8443" />
After that, I needed to delete the deployment server, then add the server back in, deploy, start Tomcat, and everything worked just like you said it would (except that now I connect to http://localhost:8081).